Setting Up POS Defaults
Liberty POS contains a number of default settings to make working with POS faster and easier.
How To Access The POS Settings
1. Select the More button from the main menu. 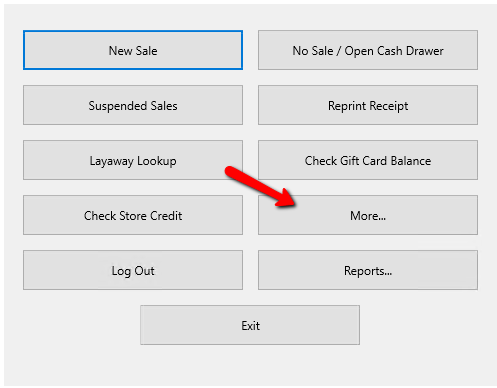
2.You will be prompted to Login. Enter your credentials and press the OK button at the bottom.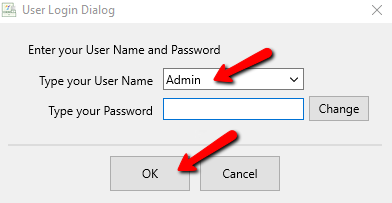
3.Select the Setup button once logged in.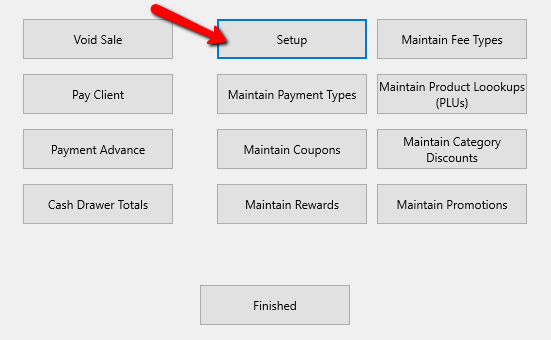
4.Due to the sensitivity of the settings in the Setup section of the POS, you will be required to login again.

General Section
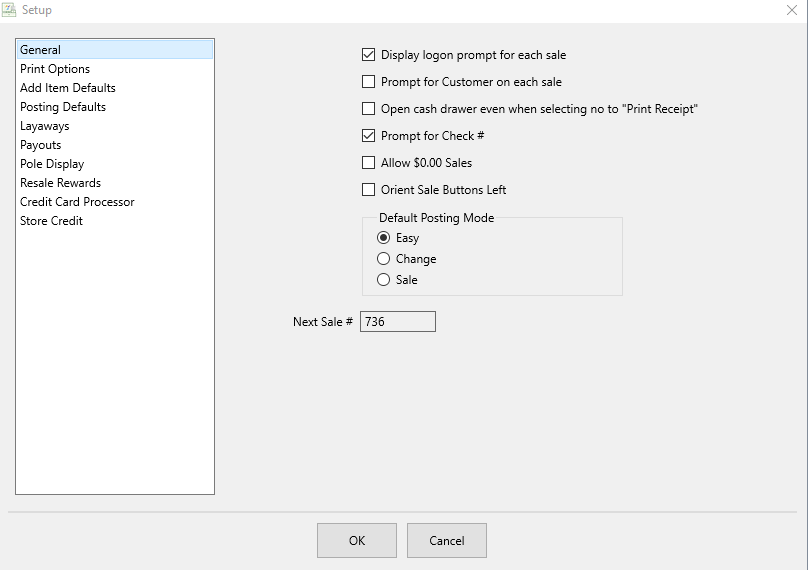
●Display Logon Prompt For Each Sale : When checked, requires sales clerk to log on with a user name and password before every sale. See Set Up Employee Access to Liberty for more information.
●Prompt For Customer On Each Sale : When checked, requires the sales clerk to lookup a customer prior to transacting a sale. Used for tracking customer purchases. See Track Sales by Customer for more information.
●Open Cash Drawer Even When Selecting No To "Print Receipt" : Recommend that this be yes (with a check in the check box). For more information see the section entitled Set Up PoS Equipment.
●Prompt For Check # : Select when you wish to track check numbers. A dialog will appear to enter the check number whenever Check is chosen as the method of payment.
●Allow $0.00 Sales : When checked, sales that total up to $0 are permitted.
●Orient Sale Button Left : Checking this will move all the Sales buttons to the left side of the screen.
●Default Posting Mode : Choose the posting mode you use most often.
○Easy Post : Posts items at the same price as on the tag. When automatic markdowns are in effect, Easy Post will automatically calculate the correct, marked down price. See Sell an Item for Regular Price for more details.
○Change Post : Use Change Post to change the price an item sells for, or to change its taxability. See Changing the Selling Price of an Item for more details.
○Sale Post : Use Sale Post to discount items by a specific percentage (for instance, during a 20% off sale). See Sell an Item at a Percentage Discount for more details.
●Next Sale # : Indicates the number that will be assigned to the next sales transaction.
Print Options
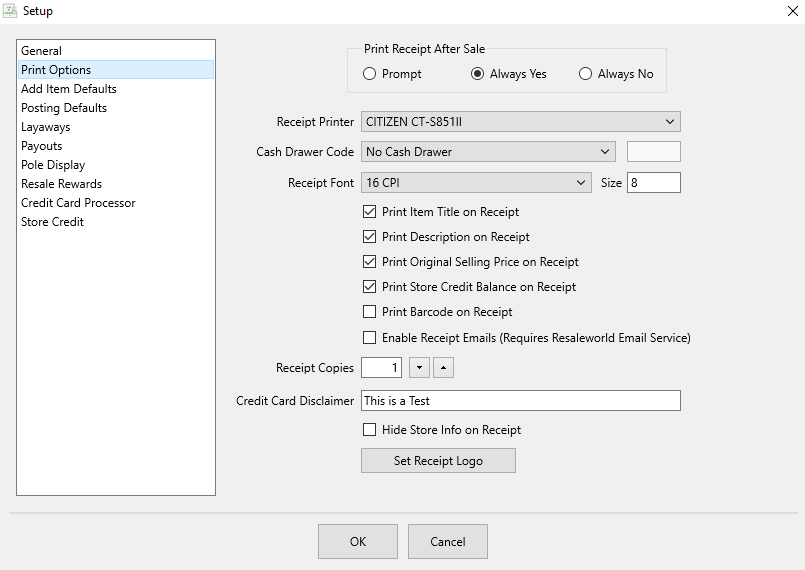
●Print Receipt After Sale : Choose whether or not users are to be prompted to print a receipt, always print a receipt or never print a receipt.
●Receipt Printer : Select the correct printer for printing PoS Receipts. See Recommended Peripherals for more detail.
●Cash Drawer Code : Select the correct Cash Drawer Code from the drop-down list. Be default this is set to No Cash Drawer and this will be sufficient for most users. For older printers, please consult your printer’s documentation.
Note: If you Cash Drawer requires a numerical code, that will be placed in the box to the right of the Coed Type you select.

●Receipt Font : Enter the font you wish to use when printing receipts. By default, printers purchased from Resaleworld work best with 16 CPI.
○Size : Here you can designate the size of the font on the receipt.
●Print Item Title On Receipt : When checked, the Item Title will be printed on the receipt.
●Print Description On Receipt : When checked, the Item's Description will appear on the receipt.
●Print Original Selling Price On Receipt : When checked prints the item's Original Selling Price on the receipt.
●Print Store Credit Balance On Receipt : This will print the remaining balance on the receipt when the account is added to the sale.
●Print Barcode On Receipt : Select this option to print a barcode on the receipt. This will allow you to scan the barcode and find a sale based on the sale number.
●Enable Receipt Emails (Requires Resaleworld Email Service) : This provides the ability to email receipts to customers.
Note: You will need to sign up for emailed receipts through My.Resaleworld.com which is free for those on the Resaleworld Support and Tag Plan.
●Receipt Copies : He you can designate the number of receipt copies you would like printed for each sale.
Note: This does not affect signature receipts if you have integrated Credit Card Processing. Those are controlled through your Credit Card processor.
●Credit Card Disclaimer : This will appear at the bottom of the Signature Receipt for credit card transactions.
●Hide Store Info On Receipts : Check box used to indicate that your store information will not be printed on the receipt.
●Set Receipt Logo: This option will allow you to view the current logo, clear the logo, or change to a different one. See Add A Logo To Your Receipt for more information on adding a logo.
Add Item Defaults
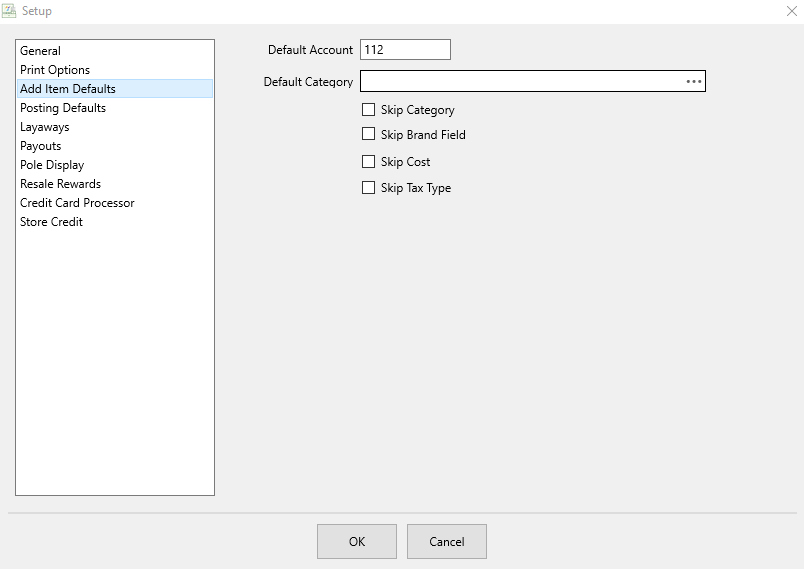
●Default Account Number : When adding items to the Point of Sale, this is the account number you wish to be the default for adding the items to.
Note: Items cannot be added to Retail Accounts from the POS. Only consignment accounts.
●Default Category : This will be the default category an item is added to within the POS.
●Skip Category : Checking this box will skip over the need to add a Category to an item when entering in the POS.
●Skip Brand Field : Checking this box will skip over the need to add a Brand to an item when entering in the POS.
●Skip Cost : Checking this box will skip over the need to add a Cost to an item when entering in the POS.
●Skip Tax Type : Checking this box will skip over the need to add a Tax Type to an item when entering in the POS.
Posting Defaults
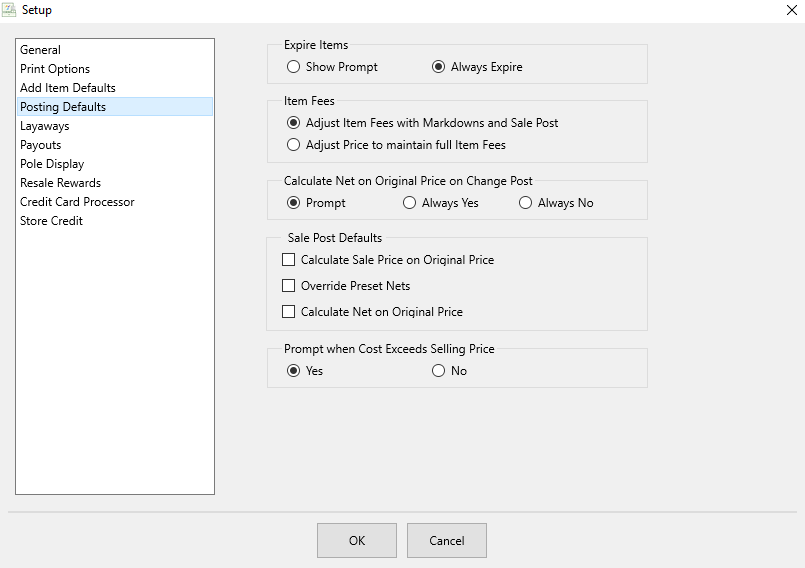
●Expire Items : There are 2 settings for Expired Items.
○Show Prompt : Will prompt you to see if you would like to mark the item as expired.
○Always Expire : There will be no prompt and the item will just be marked as expired.
●Item Fees : There are 2 settings for Item Fees.
○Adjust Item Fees With Markdowns And Sale Post : Reduces the item fee when the item price is reduced.
○Adjust Price To Maintain Full Item Fees : Keeps the full item fee when an item price is reduced.
●Calculate Net On Original Price On Change Post: There are 3 settings for Calculate Net On Original Price On Change Post.
○Prompt : Marking this will make it so you are always prompted on how to calculate the NET when the price of an item is changed.
○Always Yes : Marking this wall always calculate the NET on the original price when the price of an item is changed.
○Always No : Marking this will never calculate the NET on the original price when the price of an item is changed at the point of sale.
●Sale Post Default : There are 3 settings to choose from. Checking these boxes set the defaults for the Sale Post when selecting Sale Post from the POS.
○Calculate Sale Price on Original Price : Checking this off will default the sale to calculate the new discounted price on the original price the item was entered into the system.
○Override Preset Net : Checking this off will default the sale to calculate the NET rather than assign a NET if the Cost/NET field of an item is filled out.
○Calculate Net On Original Price : Checking this off will default the NET to be calculated based on the price the item was before the discount was applied.
●Prompt When Cost Exceeds Selling Price : There are 2 settings for Prompt When Cost Exceeds Selling Price.
○Yes : If an items is attempted to be sold in the POS and the cost of the item Exceeds what the item is selling for, a prompt will come up at the POS alerting the sales agent.
○No : If an items is attempted to be sold in the POS and the cost of the item Exceeds what the item is selling for, an alert at the POS will not be provided.
Layaways
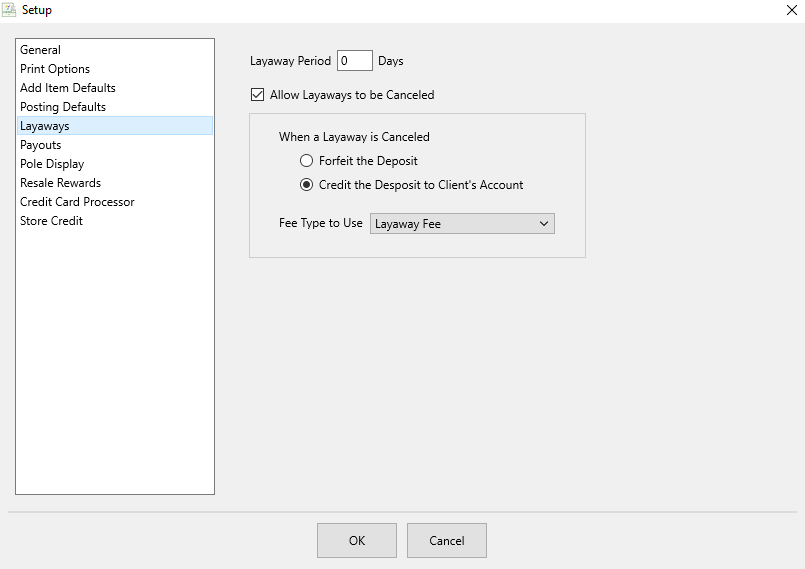
●Layaway Period X Days : This allows you to set a time period for layaways. This time/date period will be reflected on the receipt the customer receives.
●Allow Layaways To Be Cancelled : This allows for automatic actions to be taken when canceling layaways. See Cancel A Layaway for more details.
●When A Layaway Is Canceled : There are 2 settings for this section.
○Forfeit The Deposit : Having this selected will cause the customer to lose the deposit for the layaway that they decide to cancel.
○Credit The Deposit To Client’s Account : This will return the deposit to the customer’s account in the form of Non-Payable store credit. See Add a Credit/Debit to a Client Account.
●Fee Type To Use : Allows one to select the fee type to be used to create the above actions. (It is recommended to create a fee type called Forfeit Layaway for this purpose). See Set Up Fee Types for more info.
Payouts
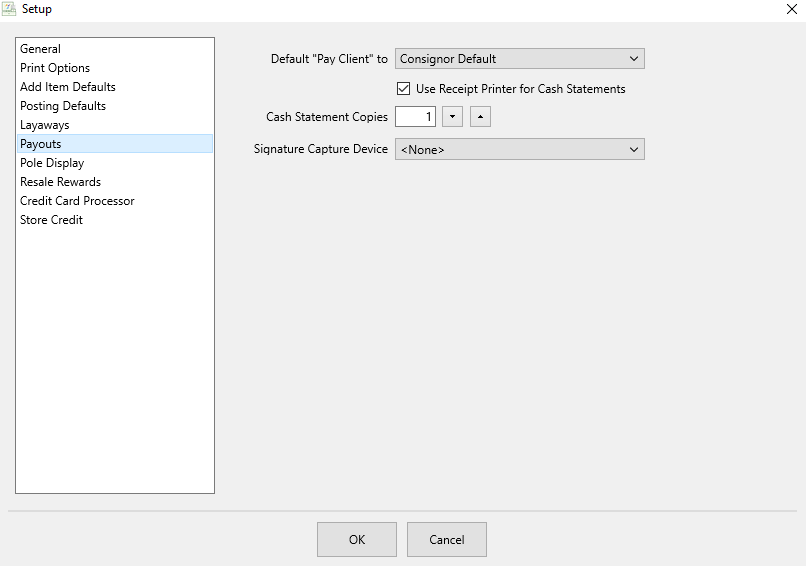
●Default "Pay Client" To : This allows you to set which payout account to use as the default when doing payouts from POS. It can be set to use the Cash or use the client's default payment account.
●Use Receipt Printer For Cash Statements : Checking this box will print cash payouts on the receipt printer instead of the standard printer
●Cash Statement Copies : This allows you to set how many copies of the payout statement to print.
●Signature Capture Device : This drop-down allows you to select which device to use to capture the client's signature for the payout. (Only applies if the equipment is installed and in use.)
Pole Display
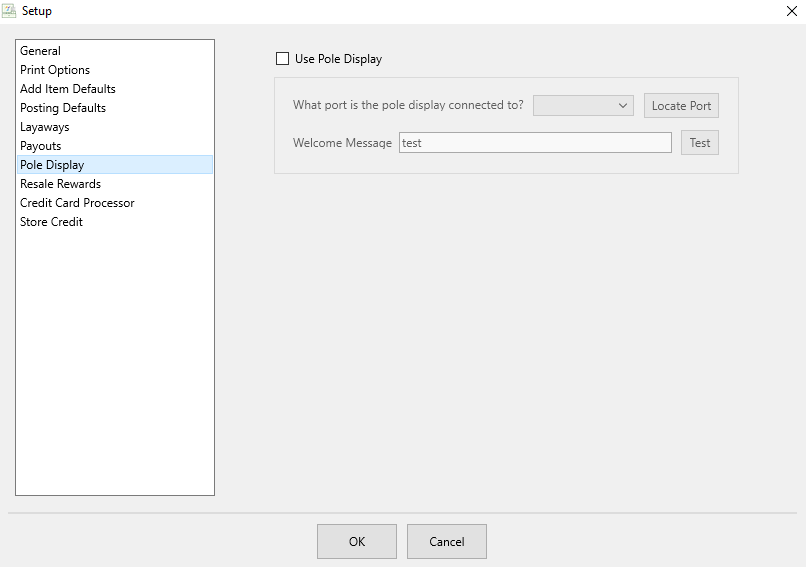
●Use Pole Display (Check Box) : Checking this off will allow the use of a Pole Display so customers can see the transactions as they are rang up.
●What Port Is The Pole Display Connected To? : This is the COM Port associated with the Pole display.
○Locate Port (button) : Use this to help locate the COM port the pole display is using.
●Welcome Message (W/Test button) : Type in a test message in the blank field and press the Test Button. If the Pole Display was successfully installed, the message entered in the test section will appear on the display.
Resale Rewards
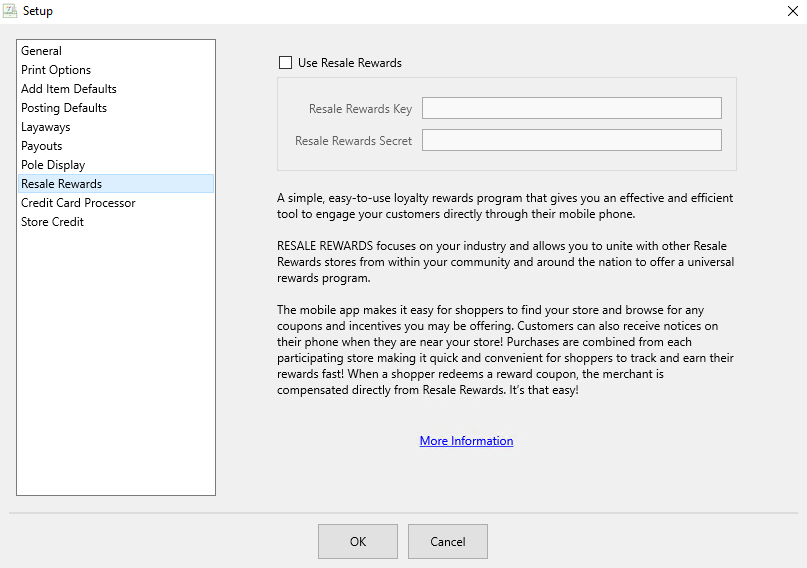
●Use Resale Rewards (Check Box) : Checking this off allows stores to setup and use the Resale Rewards System.
●Resale Rewards Key : Enter the Resale Rewards Key associated with the store account.
●Resale Rewards Secret : Enter the Resale Rewards Secret associated with the account.
Note: Checking off Use Resale Rewards affects what information the Maintain Rewards Button shows. When checked Maintain Rewards Button will display the different coupon settings for Resale Rewards. When unchecked it will show the rewards plans offered in the Liberty Software. See Choose a Reward Plan System , Resale Rewards Setup and Set Up an In-Store Reward Plan for more information on rewards plans.
Credit Card Processor
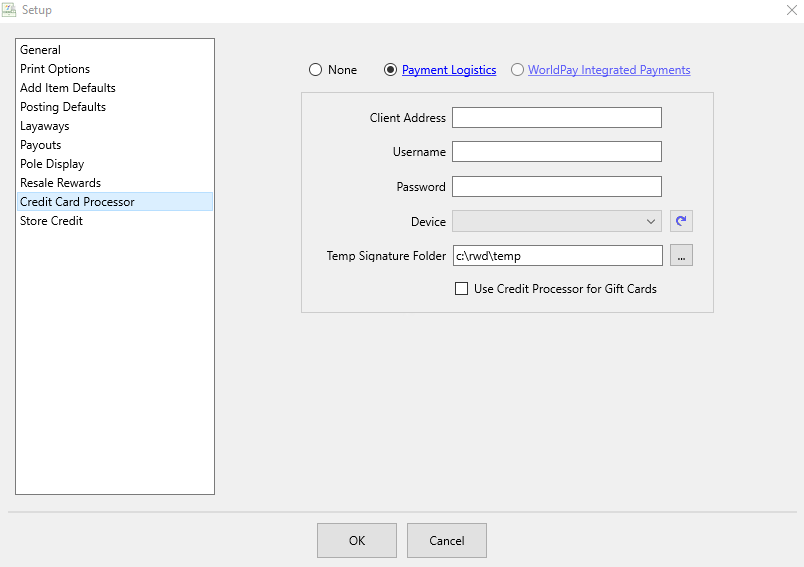
●None : By default None will be selected. Once an integrated processor is selected, then either Payment Logistics or Worldpay will be selected.
●Payment Logistics : Payment Logistics will set up the POS integration for the customers. Simply calling Payment Logistics and asking them to set up the POS, is all that will be needed. They will do the rest.
●Worldpay Integrated Payments : Worldpay is set up with the help of a Resaleworld technician.
○Client Address : Client Address should be set to localhost, specifying the port where the service is running (example: http://localhost:8180).
○Username : Not required for Worldpay.
○Password : Not required for Worldpay.
○Device : Click the dropdown box and select the credit card reader associated with this machine. If you do not see the device, press the Refresh button (Button with a curved arrow) to the right of the dropdown box.
○Temp Signature Folder : This is the directory where signature capture is stored until completed. To set the path for the temp file, click the Navigation Button (Box with 3 small dots) to the right of the Temp Signature Folder field and navigate to the folder you wish to use.
○Use Credit Processor For Gift Cards (Check Box) : Check this box if your Credit Card Processor will be handling balances for your gift cards.
Store Credit
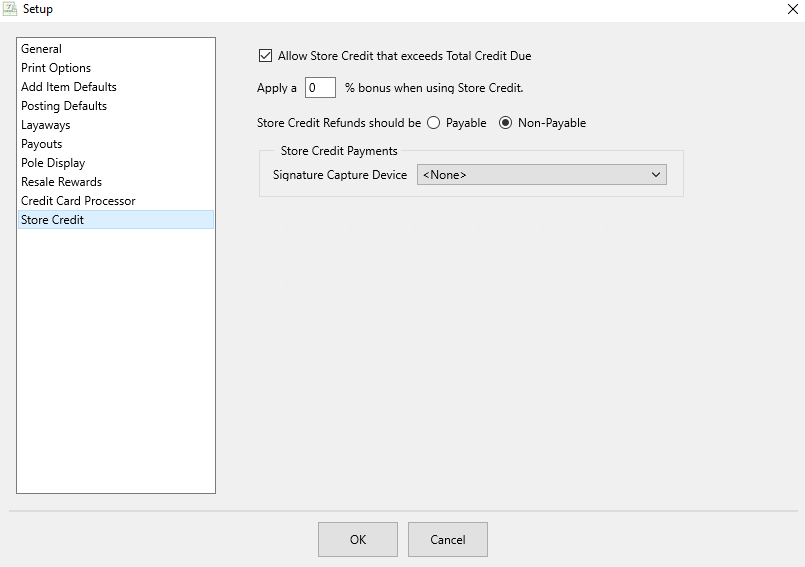
●Allow Store Credit That Exceeds Total Credit Due (Check Box) : Checking this box will allow a customer to use more store credit then what is on their account, putting the customer into a negative balance.
●Apply a X% Bonus When Using Store Credit : Indicates the amount of bonus payment to apply when paying for items using Store Credit.
●Store Credit Refunds Should Be : There are 2 settings for this.
○Payable : This will allow a customer to get refunds as a payable balance.
○Non-Payable : Customers will get refunds in the form of Non-payable store credit that can only be used in the store.
●Store Credit Payments:
○Signature Capture Device: Select the dropdown box and choose the device desired for signature captures.