Entering Inventory Items' Information
Liberty is designed to be highly flexible, which gives you the power to handle your inventory pretty much any way you desire. Follow the steps outlined below to enter items that are either:
●Consigned
●Purchased Outright from an individual (not a company)
●Trade
●Store Inventory
Do not use these instructions for entering items into a Retail Account. For information on how to enter items that are purchased from a company to be sold at retail, please see the section entitled Add Retail Items.
Note: Before adding Consignment items, you must create an account for the client whose merchandise you plan to sell.
Before you begin adding items to Liberty, it is STRONGLY RECOMMENDED that you perform the steps necessary to setup Liberty's inventory processes properly. Please pay particular attention to the sections on Categories, Attributes and Price Codes prior to adding inventory. It also highly recommended that you start out in Training Mode. Using Training Mode will prevent any mistakes you make while learning Liberty from having any impact on your business.
Note: When a variety of choices for performing a task are provided, the term recommended will appear next to the choice felt to be the overall best choice from those available.
Entering Consignment Items
Follow the instructions below to enter item information. When finished, select the Save button. If you do not save your changes by clicking the Save button the information entered will not be saved.
Note: It is not necessary to enter information in every field. In fact, the only fields that require the user to enter information every time an item is added are the Category and Price fields. All of the remaining fields are either filled in automatically based on default settings, or else they don’t usually need information entered.
1.In Liberty Inventory, Lookup the account. 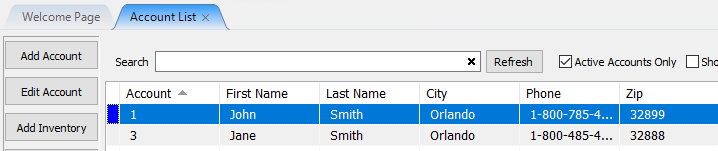
2.Go into the account and select any of the following:
a.Click on the Add Inventory button, which is located on the left side of the screen.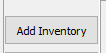
b.You could also click on the Task button, then select Add Inventory.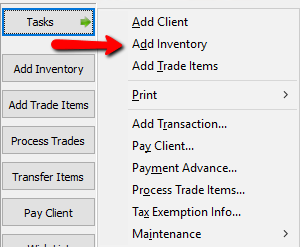
Use the <Tab> key to move from field to field while on a particular screen: use the mouse only to move from tab to tab (e.g. to display the Auction Detail tabs). As much as possible, don’t use the mouse - it’s much faster to keep your hands on the keyboard! See How to Enter Items Faster for more information on how to enter inventory more efficiently and quickly.
• Item Entry : This window will display, and you will be in Add Mode. The cursor will be in the Process Date field.
•Date Entered (required field) : Today's date will automatically appear. If you need to change the date, type it in using MM/DD/YYYY format, or click on the drop-down and select from the calendar that displays.
•Purchase Method (required field, but automatically filled in based on default setting) : Purchase Method is located to the left of the Date Received field. The Purchase Method will be either Consign, Purchase, or Store Inventory, depending on the default setting for this field. Make sure the correct method is selected, if not, change it before proceeding. Trade Items are entered separately See Trade Item Entry Process.
To change the default Purchase Method for just the account you are currently in, look for the Form of Acquisition field and change the method as needed.
To change the default Purchase Method for all accounts, select Setup > Options > Account Defaults, and change the Purchase Method default. See the section entitled Set Up Account Field Layout for more information.
•Process Date (required field) : The date the item is put on the floor. By default this will be the same as the Entered Date.
•Item Number : Is a system generated fields and can not be modified. Once the item has been saved, the Item number field will show the item number of the item, and the status will tell you the status of the item. Available, Unavailable, and Needs Info are the three statuses an item can have.
•Status fields : Is a system generated fields and can not be modified. Once the item has been saved, the Item number field will show the item number of the item, and the status will tell you the status of the item. Available, Unavailable, and Needs Info are the three statuses an item can have.
•Title : A phrase created by Liberty that combines the Category 3, Brand, and Primary Attribute (see Categories Overview).
•Category (required field) : After making sure the Date Received and Purchase Method are correct, press the <Enter> key to move on to the Category field. Don't use the mouse, entering inventory is much faster when you keep your hands on the keyboard as much as possible, see the section entitled Keyboard Shortcuts for more information.
Note: Categories are best setup prior to beginning to enter items. For a full discussion and description of Categories, please start by referring to Categories Overview for more information.
Choose the appropriate Category by either:
a.Typing the Category you wish to enter (recommended, as this is the fastest way), e.g. blouse or table.
b.Pressing <F2> and selecting from the list presented in the Select Category popup.
c.Clicking on the drop-down and selecting the appropriate Category.
If the Category you need is not in the system, either:
a.Go to Setup > Categories > Category Editor. Create the new category using the Maintain Categories window (recommended).
b.Pressing <F2> and Select the Add button.
The Category Quick Add popup will display: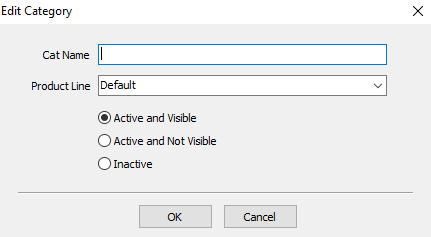
c.Enter the name for the new entry in the Category field.
d.Select the Product Line that is appropriate for the Category from the drop-down list.
e.Click OK. An error message will display if you have entered a duplicate Category
•Attributes (optional field) : Each Category may have one or more Attributes associated with it. Entering Attributes is optional, so if you wish to leave an Attribute field blank press the <Enter> key to advance to the next Attribute field, or press the <Tab> key to advance to the Description field.
To enter an Attribute, type the Attribute Value (by Value we mean, for instance, the word Large being used in the Size field, or word Red in the color field). You may also choose from the drop-down list.
If the Attribute Type or Attribute Value you wish to enter is not in the system, you will be unable to enter the Attribute until you add it to the Attribute List. This is accomplished using the Category Editor, which is reached by selecting Setup > Categories > Category Editor, then selecting the Add button under Attributes.
Once the Attributes have been entered, press <Enter> or <Tab> to advance to the Description field.
•Description (optional field) : Use this field to describe the item. If you are not using Attributes, use this field to describe the item in as much, or as little, detail as you wish. If you are using Attributes, do not repeat information in the Description field, as doing so is redundant and wastes time. When finished, press <Enter>.
Pressing <F2> will cause the Description Lookup Popup to appear. Use this popup to save time by entering frequently used Descriptions. This is particularly useful for slow or non-typists.
•Price (required field) : Enter the selling price for the item, then press <Enter>. If the price is a whole dollar amount, e.g. $10.00, just enter the dollars and press <Enter>, it is not necessary to enter the .00 as this will be automatically filled in. See the section on Price Extensions for more details.
•Retail Price (optional field) : Retail Price represents the original retail price for the item. This price may be printed on the price tag with the term Original Price appearing ahead of this retail price. This is a good selling feature, as it lets the customer know the value of the item when it was originally purchased.
Example: A table in good condition being sold for $95.00 might have originally cost $395.00. Putting $395.00 in the Retail Price field will cause Original Price: $395.00 to be printed on the price tag.
•Price Code (required field, but automatically filled in based on default settings) : The primary purpose of the Price Code is to specify how the sale price of a consigned item is split between the store and the client. It also controls automatic markdowns, items fees and other factors that affect the sale of One of a Kind items.
Price Codes must be setup before the system is put into use. The default Price Code for all accounts is Price Code A, however, this may be changed (see below). For convenience, each account also has its own default Price Code. See the section entitled Define Default Information for Accounts.
To Set or Change an Account's Default Price Code:
c.Lookup the Account.
d.Click on the Preferred Price Code field's drop-down and select the default Price Code.
e.Click the Save button.
•Cost/Net (optional for consigned items, required for purchased items) : The use of this field depends on the Purchase Method:
f.When Purchase Method = Purchase : enter the amount to be paid to the Seller for the item. An amount MUST be entered.
g.When Purchase Method = Consign : leave this field blank (zero) UNLESS you wish to assign a Preset Net amount to the item.
A Preset Net is an amount entered into the net field to guarantee the consignor receives a specific amount of money if the item sells instead of an amount based on a percentage of the sale. For example, if a consignor brings in an expensive item, she might say I don’t want you to sell this item unless I get at least $450 for it. You figure you can sell it for $600 - $700, but since you usually sell items based on a 50/50 split, to accept this item an exception must be made.
By entering $450 in the Cost/Net field, the consignor is guaranteed that no matter how much the item sells for, she will receive $450. This is because any figure other than zero entered into the Net field will override the regular consignment split (which is defined by the item's Price Code).
Note: Price tags for items with a Preset Net contain a series of numbers instead of the letter(s) denoting the Price Code. This series of numbers is the Preset Net to the consignor in coded form. $450.00 will appear as 100450001. Drop the 1’s and leading 0’s, place a decimal two places in from the right, imagine a dollar sign dancing in front of your (consignor’s eyes in this case) and you have $450.00.
•Allow Donate (required field, but automatically filled in based on default setting) : If this box is checked than the item may be donated if it does not sell. If the box is not checked then the item cannot be donated, a message will appear stating Donation is not allowed for this item. (Items are donated using the Post Items routine.)
The purpose of this field is to allow you to ensure items that should not be donated, those that should instead be returned to the client or kept in the store for some other reason, are not inadvertently donated.
When accounts are created they default to allowing all items to be donated. If you have a client who does not wish to have any items donated, you can specify that no items in this particular client's account will be donated by following these steps:
h.Lookup the Account.
i.Click on the Allow Donate checkbox to remove the check mark.
j.Click the Save button.
For additional information, see also Define Default Information for Accounts.
•Tax Type (required but rarely changed field) : While information is required to be entered in this field, it is rarely necessary to change this field. This is because the Category controls the Tax Code. In other words, when you enter the Category, the Tax Code is automatically assigned to the item at that same time.
Since similar items with the same Category will rarely if ever be taxed differently, it is highly unlikely you will ever need to enter anything in this field. (In other words, why would one blouse have a tax rate of X% while another blouse has a different tax rate of Y%.) See Categories Overview, Set up Tax Codes, and Set Up Product Lines, for more information.
•Quantity (required) : This is the number of the same item you have entered. This is not the same as Tag Quantity. By default this is set to 1.
•Tag Quantity (optional field) : This is used to determine the number of tags to be printed for the entered item. This is not the same as Quantity. By default this is set to 1.
•Item Fee (optional field) : This is an additional charge that will be assessed at the Point Of Sale. This is paid by the consumer. Reasons for having an Item Fee may be for recouping cost of processing the item, handling, or maybe cleaning. Please see Set Up Items Fees for more information.
•Tag Color : is used when your Markdowns are set up based on tag color. The Tag Color is automatically assigned based on the price code the item is on. See Price Codes Overview for more details.
•Location : If using Multiple store locations, then the Location (optional field) field will be used to track where this item is physically located. Click the dropdown and select the Location the item is located at. To set up locations go to Setup > Maintain > Locations.
•Store Section (optional field) : Defines where in the store the item is located or what department the item is part of.
•Valuation (optional field) : is used to define an secondary market price. A Collectors item might have a secondary market price based on Supply and Demand. Use the Valuation field to enter that price.
•Weight, Width, Length, and Height (all optional fields) : Used to give items dimension and weight. These fields are important for shipping purposes, and if using reCommerce, required.
•ISBN (optional field) : is a unique numeric commercial book identifier. The ISBN is a number assign to all commercial books, as a way to uniquely identify the book. If you are selling books, you can enter the ISBN number in this field.
•Custom (1-5) (optional field) : Custom fields are miscellaneous provided to record information about an item in a field that Liberty has not defined.
•Keywords (optional field) : Keywords are like meta tags that get included on the item as they get pushed up to recommerce. This is so that the item becomes searchable for SEO purposes.
Example: When google crawls your website it grabs all the meta tags (keywords)for all inventory and then the consumer can search for the item with those tags in addition to what would be in the description/attributes text on page etc.
Keywords do not have any function in Liberty.
Continue adding as many items as necessary. As you add the items will appear at the bottom of the screen in the Grid. Note that the Grid only shows the items you are currently adding. To see all items, go to the Account screen.
3.When finished adding items, click the X in the Add Items Tab. This will return you to the Account Window.