Item Entry Options
To Set Up General Item Entry Options:
Use this procedure to set up preferences for Item Entry.
1.In the menu bar go to Setup > Options > Item Entry Options.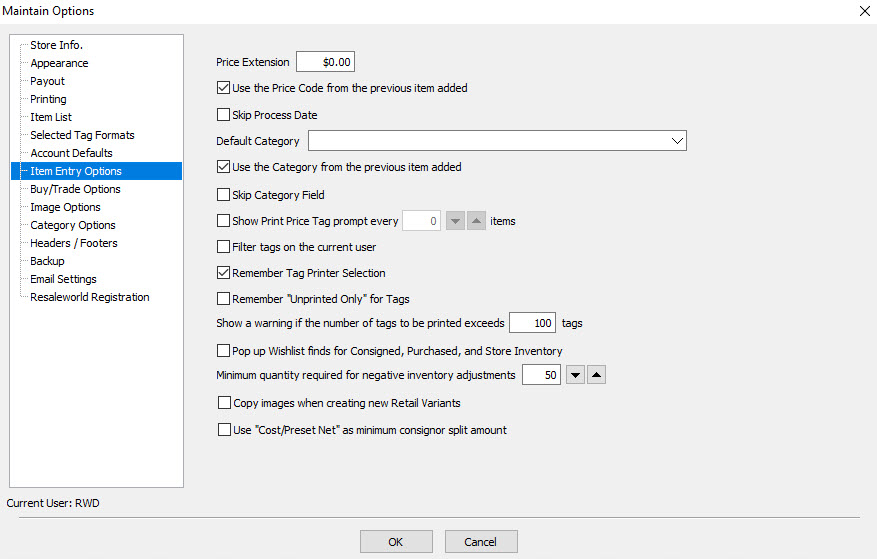
2.Make changes to the default fields as desired.
3.When finished click the OK button when done.
Item Entry Field Definitions
●Price Extension : Price Extension is the two digits appearing to the right of the decimal in a price (the cents component of price). When adding an item, if you wish to list a price of $12.00, it is only necessary to press 12 <enter>, and the cents are automatically filled in. To change from the system default of .00 for cents to another Price Extension, e.g. .99, enter the cents in this field. All items in this example will be priced with 99 cents, e.g. 12.99, 28.99, etc.
●Use The Price Code From The Previous Item Added : When adding items, the Price Code entered automatically by Liberty is based on the Price Code default, set above. Check this box if you wish to carry forward a changed Price Code as you add items.
●Skip Process Start : By default the Process Date is the same as the Entered Date. By checking off Skip Process Date during item entry when using the Tab key the Process Start Date field will be skipped.
●Default Category : If the same Category is frequently selected when entering items, entering it here as a default will help save time.
●Use the Category from the previous item added : With this option turned on, when you add an item through the item entry process and save the item, the next item you add will keep the category you last used. You can still select another category, but this helps facilitate fast item entry, if you adding the same types of items together. With this option turned off, the category will be blanked out when you save your item so that the a new category must be selected on the next item you add, in the item entry session.
●Skip Category Field : By checking off Skip Category Field during item entry when using the Tab key the category field will be skipped.
●Show Print Price Tag Prompt : Normally the procedure of printing price tags is initiated by selecting the Print Tags button at whatever point in time the user deems appropriate. If instead you wish to be prompted after every XX items are entered, select this check box and specify the number of items in the Every __ Items field.
●Filter Tags on the Current User : Activating this option causes price tags to be printed only for items entered by the user currently logged in. This can be useful when multiple users, on separate workstations on a network, are all entering items in the same account.
For example, User 1 might add items 1, 3, 6, 7, 9 and 13, User 2 items 2, 4 and 12, and User 3 items 5, 8, 10, and 11. If this option were not activated, each user would have to run the Print Price Tags routine multiple times to print tags just for the items he or she entered.
With this option activated, when a user prints tags, price tags will be printed only for items entered by that user. Using the example above, when User 1 selects to Print Tags and prints their tags, only items 1, 3, 6, 7, 9 and 13 will have tags printed.
●Remember Tag Printer Selection : When this option is selected Liberty when continue to use the printer selected rather than the printer selected in Setup>Options>Printing.
●Remember “Unprinted Only” for Tags : With this option selected when in the Print Tags window the box for Unprinted Only will be checked off for all users.
●Show a warning if the number of tags to be printed exceeds # of Tags : This option prevents the accidental printing of a large quantity of tags. A pop-up will appear when a quantity of printed tags is above the number you type into this field. The pop-up will indicate how many tags you are actually printing and will ask you if you are sure you want to print this quantity.
●Pop up Wishlist Finds : With this option selected during item entry if the item being entered matches a Wish List request a pop up window will be displayed with the account information of the customer seeking the same type of item.
●Minimum Quantity Required For Negative Inventory Adjustments : This is the minimum item quantity needed to be able to manually adjust the quantity.
Example: By default the threshold is set to 50. In order for me to be able to right click the item and change the quantity (Maybe because too many were added), the total quantity to be able to make that change would have to be at least 50.
●Copy images when creating new Retail Variants : With this feature turned on, each retail variant added will retain the images that are on the parent item within retail item entry. With this feature turned off, each variant item will have images blanked out so that you can either add new images or leave the variant without images.
Note: It is recommended that if you plan to have web listings with multiple variations based on color or size, that you have this feature turned off. Otherwise each variant will have a duplicate image in the image display area, when your customer is looking at the web listing for an item with multiple variants.
●Use "Cost/Preset Net" as minimum consignor split amount : Turning on this option allows for the possibility that a consignor could get more than the value inputted in the Cost/Preset Net field, if the applicable consigned item is sold. Turning off this option locks in the amount you type into the cost/net field as the amount the consignor will receive, when the consigned item sells.