Linking the iPad Kiosk App to Liberty
This documentation covers how to link your iPad to the Liberty Kiosk App
Here is a video on the following information:
Linking the iPad Kiosk App To Liberty Video
1.Click the Setup button then click Liberty Mobile Admin
2.Click the Maintain Authorized Devices button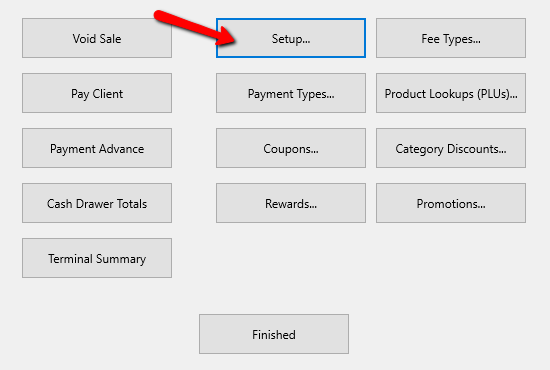
3.Sign in with an Administrator account
4.Click Add Device
5.Type in the Device Name
Note: While it says device, you are actually connecting the device app. A device might have more apps installed, like the Item Entry App or Photo App, so it may be a good idea to choose both the name of the device and the name of the app.
6.The Device Key window will appear with a QR code to scan. Leave this window open while you get the iPad.
7.On the iPad, tap the Liberty Kiosk app
8.Tap the Scan QR Setup button
9.Next, we will use the QR Code currently on your PC screen to fill in the details we need on your iPad
a.Make sure the QR Code is still open on your computer screen
b.On your iPad, your camera should be displayed in the middle of the screen. Point it at the QR Code and it will automatically scan
c.If you are a Cloud customer, choose Remote. If you are Desktop, choose In Store
d.Click the OK button on your computer screen
10.If you chose In Store you may see a message telling you that the “Liberty Kiosk” app would like to find and connect to devices on your local network. Click the Allow button
11.Click Register, then OK once it says the device was registered
12.Tap the Advanced Settings button
13.Here you can set the app’s Advanced Settings
a.Biometrics Not Allowed : If there are no biometrics enabled on the iDevice, then this option will automatically be set and grayed out. If your iDevice is enrolled in either Face ID or Touch ID, this option will be replaced with the appropriate biometric method and will allow you to turn it off or on
b.Clear Cache : Use this to clear all the cached images from the device. This is useful if an image is not showing up correctly or if it is showing an old image
c.Location : Select the location for drop off receipts
d.Printer : Select the printer for drop off receipts
e.# Copies : Select the number of drop off receipts that will print
f.Allow login with app : Allows customers to log in using the Consignor Login App on their iDevice
g.Consignor Login Camera : Sets whether the default camera mode for Consignor Login App Scan uses the Front or Rear facing camera on your iPad
h.Consignor Login Enable Light : Enables the light on the iPad while the camera is in use
i.Tag Scanning Camera : Set whether the default camera mode for Tag Scanning uses the Front or Rear facing camera on your iPad
j.Tag Scanning Enable Light : Enables the light on the iPad while the camera is in use
k.Test Scan : Scan one of your tags to verify that your iPad can scan barcodes properly
l.Click the Done button when finished
14.Tap the green Done button
15.When prompted if you would like to leave the setup mode, tap Leave
Next Article:
You are now ready to add a new Liberty Kiosk App Configuration.
Click the following link to see that article:
Adding A New Liberty Kiosk App Configuration
Related Topics
Adding A New Liberty Kiosk App Configuration
Editing A Liberty Kiosk App Configuration
Adding A Banner To The Liberty Kiosk App
Setting Up The Slideshow Feature In The Liberty Kiosk App