View Payout History
All transactions related to account payouts, include check, cash and reversed payouts, are recorded in each account's Payout History. View the Payout History to see a record of all account payouts. You can also generate various reports comprised of information contained in the Payout History.
Note: There is a Refresh button near the top of the screen. It is sometimes necessary to select Refresh to update the Payout History window to show recent Payouts.
To View Payout History For An Account
1.In Liberty Inventory, Lookup the account.
2.Click on the Payouts Tab. The Payout History will display.
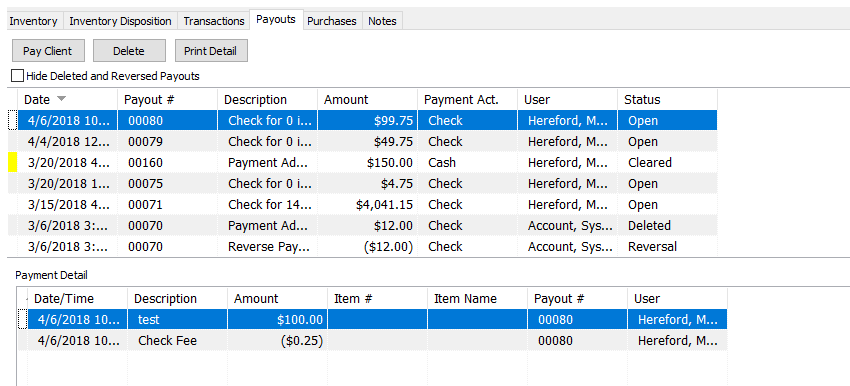
The top part of the window displays the Payouts. The bottom part of the window displays the details of the payout selected. The fields contained in each window are described below.
Note: Click on the Hide Deleted and Reversed Payments check box to reduce the amount of information that appears on screen.
Payout History Fields (Top Of Window)
●Date : Date the payout was issued.
●Payout # : Check or cash statement number.
●Description : Type of payout (cash, check, manual check, reverse payment, etc.)
●Amount : Payout amount. Note that all information in negative transactions is displayed in red.
●Payment Act. : The account the payout was issued from.
●User : Person who was logged on when this payout was issued.
●Status : Current status of the payout. Following are definitions:
○Open : Check is printed and posted, but has not yet cleared the bank.
○Posted : Check is printed, posted, and has cleared the bank.
○Deleted : Check has been deleted.
○Cleared : No longer used.
○Pending : Check never finished being posted to the account but the payout has been processed. Checks with a Pending Status can be updated to show a status of Cleared or Expired. Right click the payment and select Update Status and then select Cleared or Expired.
Payout Details Fields (Bottom Of Window)
●Date : Date item sold.
●Description : Transaction Description (sold, return, check fee, etc.)
●Amount : Transaction amount. Negative amounts are in red.
●Item # : When applicable, the number of the item in the transaction.
●Item Name : A phrase created by combining the Category 3, Brand, and Primary Attribute (see the section entitled Overview of Categories, Tax Codes, and Product Lines for more details).
●Payout # : Corresponds to the Payout # in the Payout # field at the top of the window.
●User : User logged on when this transaction occurred.
Note: You can reorder and change the size of the fields listed in the Payout History window.
To change the field order, click and dragging the field labels (the header at the top of each column) to the left and right.
To change the size of a field, hold the mouse directly over the vertical line separating each field label. The mouse pointer will change to two vertical lines. Click and drag the field to resize it.
Note: The changes you make here are Sticky - the software remembers what you did so you don’t have to redo this process.
Printing The Payout Details
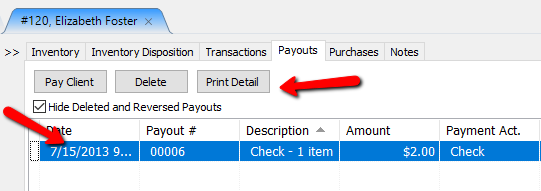
From the Payouts Tab, highlight the payout, and click on the Print Detail button at the top.

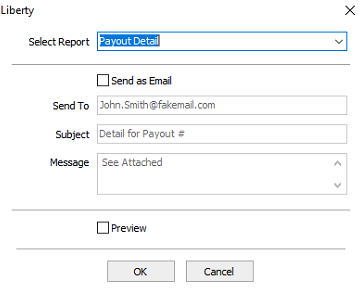
The Pay Detail Report dialog box will open.

●Select Report : Click the dropdown for Select Report and choose the pay detail report you wish to use.
●Send Email (Check Box) : Selecting the checkbox will email the report to the customer. If you choose the email the report, the Preview Check Box will not be accessible.
●Send To : Enter the email address you wish to send the report to.
●Subject : Enter the subject of the email.
●Message : Enter in a brief message to be included in the email.
●Preview (Check Box) : Us this checkbox to preview the report before printing it. If this is checked off, the Send Email Check Box will not be accessible.
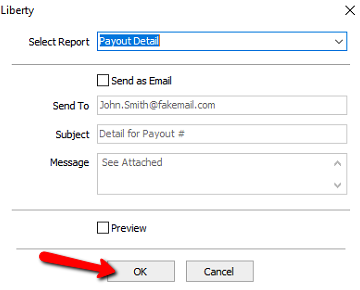
Click the OK button when done.
