Categories Overview
All items entered must have a Category assigned to them. Liberty comes with several hundred Categories already entered, however, some of these Categories are inactive by default. You must choose which ones to make active. This is accomplished in the Set Up Wizard when Liberty is first installed, and in the Category Editor afterwards.
Note: You must have at least one active category to be able to add an item.
Categories are an absolutely key part of entering inventory into Liberty. The Category field is used to categorize items, and to associate Categories with other important information, including Tax Codes, Product Lines, and Attributes.
Note: Tax Codes and Product Lines must be set up prior to setting up Categories.
Categories can be set up for simplicity by using a 1-level structure, or more complex with a 3-level structure. For most users, a 1-Level set up works best however Liberty will initially be configured to use a 3-level structure. Less “Advanced Users" looking for an easy level of inventory and the ability to generate less advanced reports have the option use a 2- or 1-level structures. See Category Editor for more details.
For example, if a store only sells a single type of inventory, such as women's clothing, there is no need to use multiple levels to categorize inventory. In a 3-Level structure, jeans would be categorized as Women's Apparel > Pants/Shorts > Jeans. 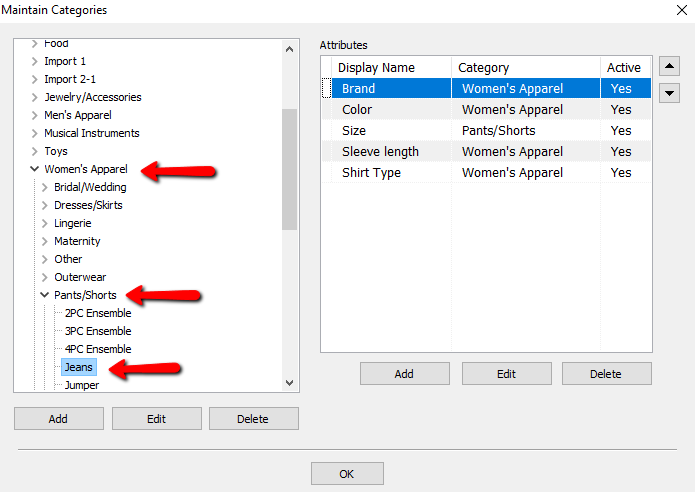
In a 1-Level structure there is no need to distinguish further, they are just Jeans.
If a store sells men's, women's and children's clothing, a three-level setup would allow them to report on each category. Three levels just gives them the ability to report by "Department," "Section" and "Item". In the previous example, this would mean running reports for "Women's Apparel", "Pants/Shorts" and "Jeans".
Each Category has a Tax Code assigned to it. This makes inventory entry more efficient, because when the item is assigned to a Category it gets its Tax Code at the same time. This combines two steps into one, which saves time.
Each Category may have one or more Attributes assigned to it. An Attribute is a characteristic or feature which helps describe the item. For instance, color and fabric help describe clothing, material and era help identify antiques. While attribute information may be entered into the Description field, there are significant benefits to using Attributes, the most important being consistent data entry.
Consistent data entry makes reports more effective, particularly the Wish List, Lost Tag, Sales, and Inventory reports. The more precise the information entered, the easier it is to analyze reports and manage business in general.
The Category Editor is used to assign Tax Codes and Attributes to Categories. It is also used to add, edit, and delete Categories, and turn Categories on and off.
Categories are a powerful tool and well worth understanding fully. Proper set up of Categories streamlines the data entry process, and provides tremendous increases in speed, power and efficiency throughout the system. You will benefit from the ability to generate inventory and sales reports, have better wish list matches, and lost tag matches in such a way as to dramatically increase the quality of the information at your fingertips. With this power you can simultaneously increase profits and save time.
Utilizing the power underlying the use of Categories does take a little time and effort. Once you see the benefits, we guarantee you will agree this time to have been very well spent.
Steps To Setting Up Categories
1.Set Up Tax Codes (should already be performed).
2.Set Up Product Lines (should already be performed).
4.Assign Product Lines to Categories
5. Add, Change, and Delete Attribute Types, Add, Change,and Delete Attribute Values, and Associate Attributes to Categories
6.(Optional) Establish prices using the Pricing Guide
Related Topics
The Category Editor
Tax Code Set Up Overview
Set Up Product Lines
Overview of Attributes