Printing Price Tags
Liberty prints a wide variety of price tags and price labels. To order price tags and price labels please contact Resaleworld. To view some of the price tag and label formats available, please see the section entitled Price Tag and Label Formats.
When printing tags and labels for one account, you may elect to print one price tag, all price tags for items entered today, price tags for a certain range of item numbers, etc. You may alternatively choose to print tags in a batch all at once using the Bulk Tag Printing routine.
Before you begin printing price tags, make sure the desired price tags are installed in the tag printer and the tag printer is turned on. If using colored tags print on the side of the price tag that is white or mostly white. Do not print on the side that has full color. Printing on the color side of the tag may be difficult to read and bar code readers may not be able to read the barcode.
To Print Price Tags for an Account
1.In Liberty Inventory, Lookup the account.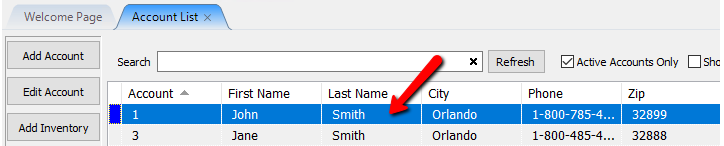
2.There are multiple ways to initiate the tag printing process.
a.Click Task > Print > Print Price Tags.
b.Right click and item and select Print > Reprint Tag. 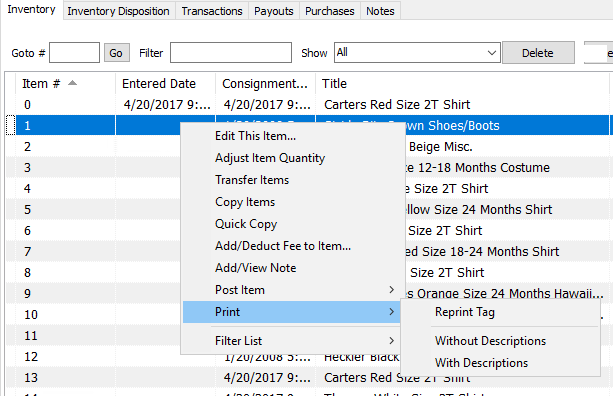
c.From Within the item, click the Print Tags button on the left.
d.During Item Entry click on the Print Tags button to the left.
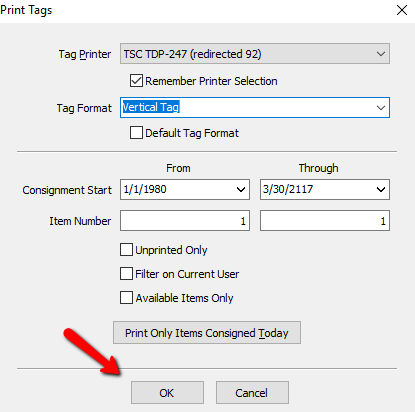
The Print Price Tags dialog box will display
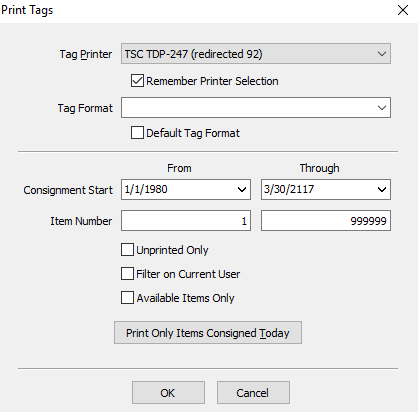
●Tag Printer : Allows you to choose between different printer if you have multiple set up.
●Remember Printer Selection : Use this selection to set a default tag printer.
●Tag Format : The Tag Format drop-down allows you to choose the style of tag you wish to print. Note, to choose the types of tags you will be using, Setup > Options > Selected Tag Style.
●Default Tag Format : Since there are many Tag Format choices, and you will likely print the same tag format on the same printer 99% of the time, the Default Tag Format check box allows you designate which tag format will be the default. Selecting a default tag format will speed up the process of printing tags, because it eliminates the need to select a Tag Format every time you print tags.
●Consignment Start : The Consignment Start fields (From and Through) refer to the date the items start their consignment. Tags will not be printed for items with a date falling outside the range entered.
●Item Number : The Item Number fields (From and Through) are used to specify which item numbers to print tags for. Tags will not be printed for items with a number falling outside the range entered.
Note: There is no character limit on the From and Through Item Number fields.
●Unprinted Only : Click on the Unprinted Only check box to print tags only for items that have not had a tag printed before.
●Filter on Current User : Stores receiving a large number of items from one client and using multiple workstations to enter the client’s inventory may find this option useful. The purpose of this option is to handle a situation where more than one workstation is used to enter items from a particular client. As a result more stores do not use this option.
Example: A client brings in 100 items. 50 items go to workstation #1, where Ed enters the items under his User ID of ED. The other 50 items go to workstation #2, where Jenn enters the items under her User ID of Jenn.
The items are entered on both workstations concurrently. As the items are added, it turns out that Ed on workstation #1 enters the first and second item, Jenn on workstation #2 the third, fourth and fifth, Ed on #1 the sixth, Jenn on #2 the seventh, etc.
When the items have all been entered, price tags must be printed. If all of the price tags are printed in one batch, then Ed and Jenn have to figure out which tags to use at which workstation. This is time consuming and tedious, so Ed comes up with a better mousetrap.
By clicking on the Filter on Current User check box, only the items entered by Ed will print on workstation #1’s price tag printer. Jenn also clicks on Filter on Current User and enjoys the same result where only the items she entered have tags printed on workstation #2’s price tag printer.
Note that for this to work, Ed and Jenn have to be logged in under their own User ID. For more information on User ID’s, passwords and security in general, please see the section entitled Set Up Employee Access to Liberty.
●Available Items Only : Will only print items with the status of Available.
●Print Only Items Received Today : When you are printing tags only for items received today, clicking on the Print Only Items Received Today Button will save you the effort of typing in today’s date in both the From and Through fields.
Tip: You will probably find using the method of specifying the Date Received range, as opposed to specifying the first and last item number to print tags for, to be the easiest method for setting the range of tags to print.
3.Select the OK button to print the tags.