Physical Inventory Reconciliation
Getting Started Guide
To access the Physical Inventory Reconciliation module in Liberty 5, you will need to:
1.Click on the Activities Menu
2.Point to Inventory
3.Click on Inventory Reconciliation.

1.When the module launches, you’ll be asked to enter your Liberty username and password. Upon opening the module for the first time, the following screen is displayed: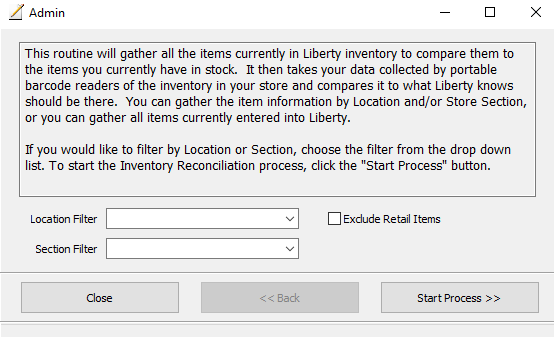
2.The first step you will perform in the Inventory Reconciliation Utility is capturing a snapshot of the Liberty Inventory which will be compared against physical inventory counts. It is best to take the inventory snapshot at the same time that the physical inventory is collected – items added to Liberty after the snapshot is taken will be completely ignored by this utility, so the fact that these new items aren’t part of the physical inventory scans won’t be a problem.
This utility can only store one snapshot at a time. While it is possible to run the reconciliation for inventory belonging to a specific store Location and/or Section, it is not possible to perform the reconciliation for two or more subsets of inventory at the same time – the previous reconciliation process must be completed or canceled in order to begin a new process.
The store Location and Section filters are blank by default. This is fine if you wish to run the reconciliation utility for all inventory at once. If one or both of these fields are set as part of item entry, you may use these as filters to perform a reconciliation on only a selected portion of the store’s inventory.
The Exclude Retail Items checkbox allows you to exclude all Retail Vendor items from the Inventory Reconciliation process.
3.Select the Location and/or Section you want to reconcile (or leave both fields blank for the entire store) and click on the Start Process button to begin. A snapshot is taken of the inventory in the database at this moment and is saved for comparison. If you ever click the Start Process button while a previous run of Inventory Reconciliation is still incomplete, you’ll receive the following warning prompt.
If you receive this message, you can choose No to continue with the in-progress reconciliation. Choosing Yes will completely restart the reconciliation process – a new snapshot is taken (the old is discarded) and any previously applied inventory counts are cleared.
Inventory Count Files
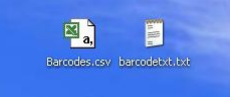
The Inventory Reconciliation Utility can accept inventory counts formatted as either a Text (.txt) file or as a Comma Separated Value (.csv) file. The input file(s) must contain a list of scanned barcodes read from Liberty printed tags. Optionally, the files may include a quantity for the specified barcode on the same line. For information on saving your scans in these types of formats, please consult your scanner’s documentation. Here’s an example of what the icons for these files might look like – this may vary depending on your computer’s setup.
1.Its not necessary to scan the your entire inventory at once – depending on the amount of inventory being scanned it may in fact be preferable to break it up into sections. If you suspect there may be an error or omission and you need to rescan your inventory, it’ll be much quicker if you only have to repeat a single rack, or single room, as opposed to an entire store. Just remember to use descriptive file names when you save your scans.
The data in the file(s) that you collect must be limited to only the scanned code, and optionally a quantity value. Any additional data, such as a scan date or time, will prevent the application from functioning properly. Again, for information on setting the parameters for the scanner to save, consult your scanner’s documentation.
2.If this is going to be your first time entering data, you should make sure that your inventory scans are saved correctly. A properly formatted .csv file can easily be opened up as either a text file or a spreadsheet – it depends on how your computer is setup. If the .csv file opens into a spreadsheet, it’ll look like this: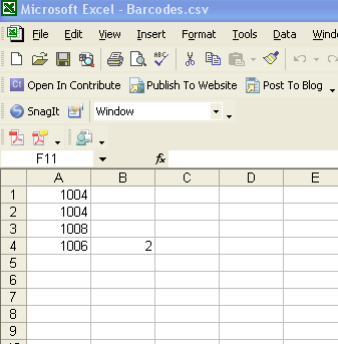
3.The left (A) column will contain a number identifying the item, and the B column will either be blank, or it may contain a quantity for the item identified next to it in column A.
If the .csv file pulls up into a text editor / word processor like Notepad, this is how it will look: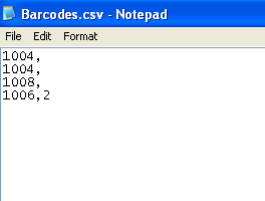
4.If your barcodes are saved into .txt format, they may be formatted a little differently, but the file should look similar to the others: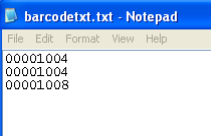
Entering Inventory Counts
Once you’ve scanned your inventory and verified that the data files are formatted correctly, you can enter the counts into the application and compare your physical inventory to the inventory stored in your database.
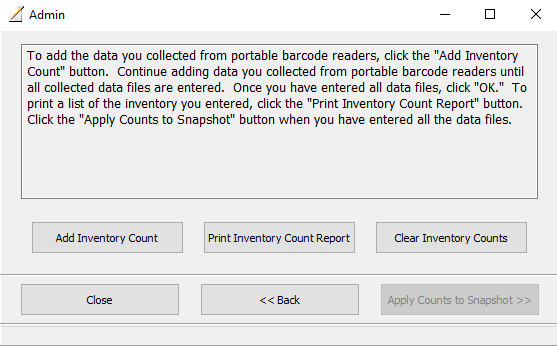
1.Once the Inventory Reconciliation utility captures an inventory snapshot, you will be taken to the next screen (pictured above). From here, it is possible to add inventory counts, and to run a report on the Inventory Counts that have been applied. The “Apply Counts to Snapshot” button will be greyed out until at least one Inventory Count has been added.
Click “Add Inventory Count” to select a file containing barcode scans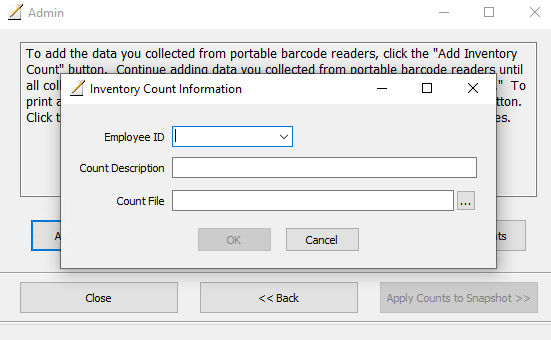
2.The Inventory Count Information gives you a way to tie an Inventory Count file to the employee who recorded the actual scans. To do this, select the appropriate Liberty User ID under the Employee ID dropdown. This will show up on the Preview Inventory Count report. Note – an Employee ID must be selected in order to add an Inventory Count. You can choose the default login for this if you’d prefer not to use the specific employee.
The Count Description gives you an optional way to indicate just which scans the Inventory Count File contains. You can type in something descriptive such as “Front Room Scans 12/1/2013” – or you can leave this blank.
The Count File box is where you browse to the actual file to be used for this. Once you have selected the file, click OK. You will be returned to the previous screen.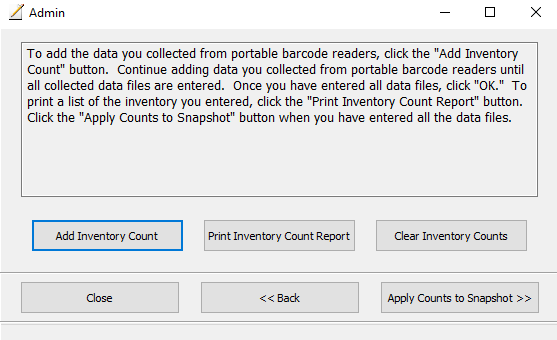
3.The Print Inventory Count Report button takes you to a report that displays basic information about Count that has been compiled thus far. Note – the quantity on-hand expected is NOT based on the snapshot that was taken, it is based on what Liberty shows at the time this report is run. The Discrepancy Report, run from the next section of the Inventory Reconciliation utility, provides a comprehensive analysis of differences between the inventory counts and the snapshot that was taken. 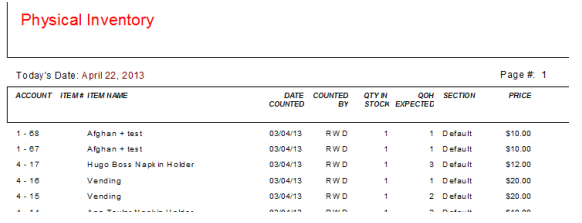
4.If there is a need to clear and re-apply Inventory Counts, click the “Clear Inventory Counts” button. In cases where there was an issue with one or more of the barcode scan files, this allows for a fresh start without starting a new snapshot.
It is possible to take a new snapshot by clicking the Back button until you arrive back on the Start Screen. Keep in mind that taking a new snapshot could result in newly added items to be included, which may not be part of your physical inventory counts.
Once you are satisfied that the inventory counts have been added correctly, click Apply Counts to snapshot to advance to the next step.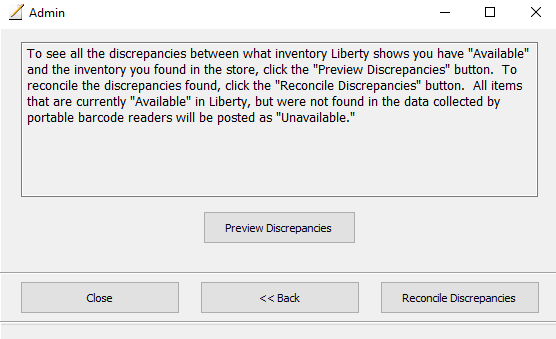
5.Now that Inventory Counts have been applied to the snapshot, the next step should be to Preview Discrepancies. 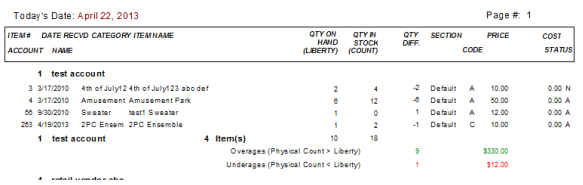
6.The Inventory Exception report provides a detailed listing of any items where the scanned quantity doesn’t match the quantity captured in the inventory snapshot. The report organizes records by account, and includes separate totaling for overages and underages. The cost for Retail and Purchase items is included in the report.
The final step of Inventory Reconciliation is to perform the reconciliation for all items included in the snapshot that were not part of the physical inventory count. Note – Inventory Reconciliation is not capable of increasing the inventory counts in Liberty – it can only decrease inventory counts. To begin the actual reconciliation, click the Reconcile Discrepancies button.
It is recommended that you perform this process outside of normal store hours, as it can tie up system resources.
Items that show up as underages are posted with a posting status of Reconcile when you choose to Reconcile Discrepancies. They will be treated similar to items posted as Donated or Returned in various Liberty reports.
Upon completion of the Reconciliation process, you will be prompted to view any remaining overages – items that were included in the physical inventory count that show a higher quantity than what is reflected in the inventory snapshot. This is simply a rerunning of the Inventory Exception report, except it excludes the items reconciled.
This completes the processes run by the Inventory Reconciliation Utility.