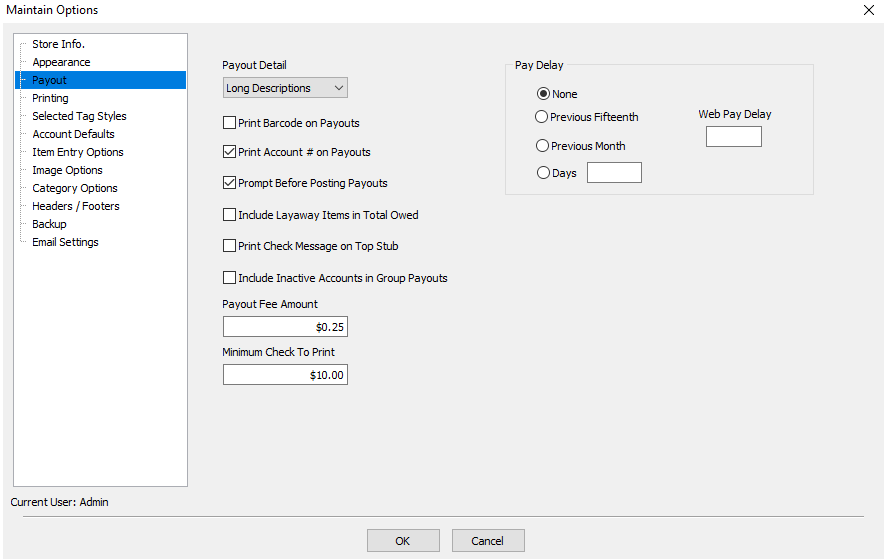
Payout
The term Payment Defaults refers to consignor payouts.
To Set Payment Defaults:
1.In the menu bar go to Setup > Options > Payout.
2.Make changes to the default fields as desired
3.When finished click the OK button.
Payout Default Options
●Payout Detail :
○Long Description - Will print the item numbers, the title of the items, the amount the items sold for, and the amount to be paid for the item.
○Normal - Will print just the item numbers and the amount paid for the item.
○Summarized - Will print the total number of items sold with the total amount to be paid, the total number of debits with the total amount of the debts, and the total number of credits with the total amount of the credits.
●Print Barcode on Payouts : Check to include a barcode on client checks. The barcode is used to Clear Checks after they are cashed.
●Print Account # on Payout : Check to print account number on checks.
●Prompt Before Posting Checks : Check to be prompted before posting checks as paid. It is recommended that this option be left turned on.
●Include Layaway Items in Total Owed : Checking this option will cause credit from items on layaway to be available for use for store credit purchase. This will also cause these pending transactions to be uploaded to the optional Consignor Login service.
●Print Check Message on Top Stub : Check this option if the check message should be printed on the top stub of the check rather than the bottom stub.
●Include Inactive Accounts in Group Payouts : Check to include any accounts that have been set to inactive but have payable money.
●Payout Fee Amount : Enter how much (if any) you will charge a client for issuing a check.
●Minimum Check to Print : Enter the smallest amount for which the system should print checks.
Pay Delay
●None : Select to allow clients to be paid any time after an in-store sale is made.
●Previous Fifteenth : Select to issue payments for in-store sales made up through the 15th day of the previous month.
●Previous Month : Select to issue payment for in-store sales made up to the last day of the previous month.
●Days : Select and enter the number of days before a client can be paid after and in-store sale is made.
●Web Pay Delay : Enter the number of days before a client can be paid after an item sells online. Note that the amount entered is added to the regular pay delay.
Example: Regular pay delay is set to 10 days. Web Pay Delay is set to 5 days. Account holders will not be paid for items that sell online for 10+5=15 days.
