How to use the Liberty Photo App for Android
To view the companion video for the following article, please visit the following page:
How To Use The Liberty Photo App for Android Video
How Use The Camera To Add Images To Items By Using Account - Item Number
1.You can now either open the Liberty Photo App from the Google Play Store or from your Android device’s Home Screen or App Locker. 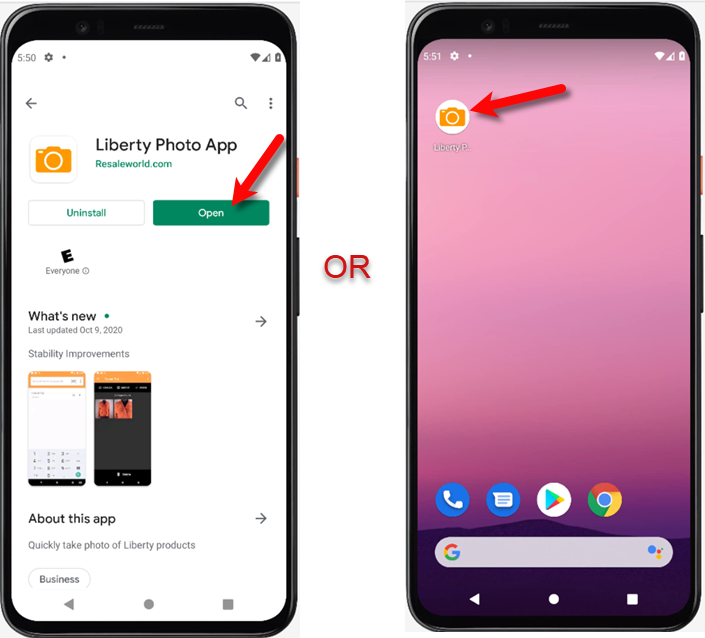
2.Sign in with your Username and Password, then tap the Remember Me checkmark box if you want the application to remember your login details. Finally, click the Sign In button. 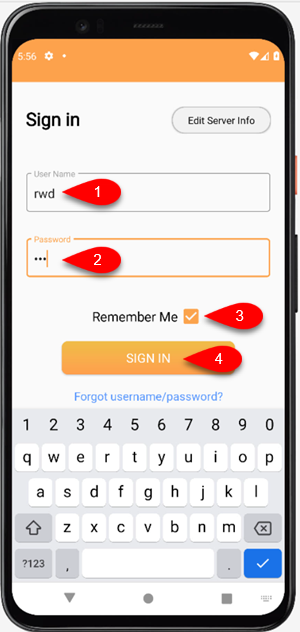
3.Tap the While using the app button when prompted if you want to allow Liberty Photo App to take pictures and record video. 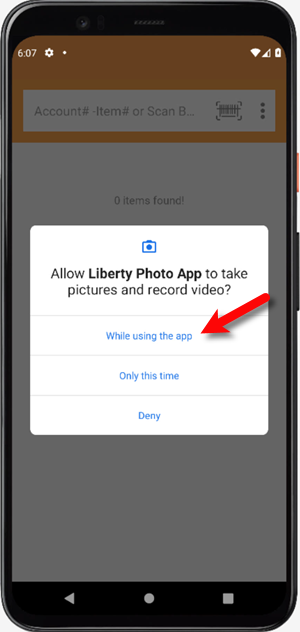
4.Tap the Allow button when prompted if you want to allow Liberty Photo App to access photos, media, and files on your device.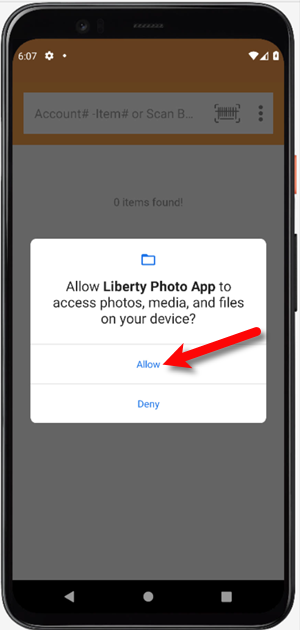
5.You can type in the Account - Item Number of an item in the search field to search for that item.
Tap the Search button when finished. 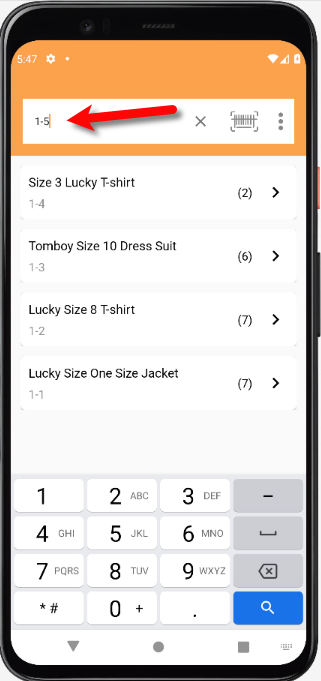
6.The item will then appear in the list, you can then tap on that item. 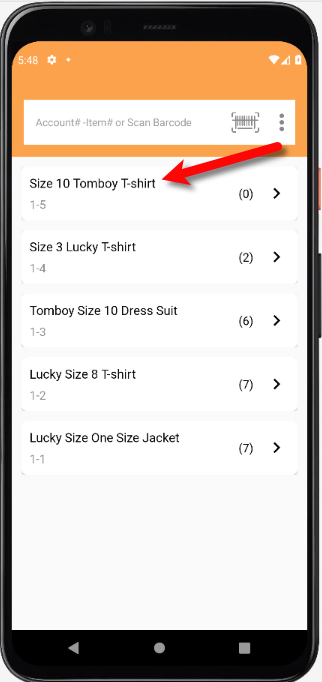
7.From here, you can tap the Camera icon to bring up your device’s camera. 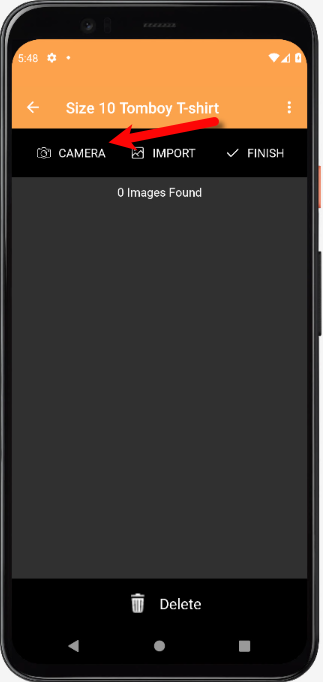
8.Tap the Take Picture button when you are ready
9.You will have some options you can edit after taking a picture of your item.
a.Exposure Control: This sets the exposure level of the image. Raising the radio bar higher makes the image brighter, while lowering the bar makes the image darker.
b.Brightness: Allows you to change the brightness of the image by sliding the bar from left to right.
c.Contrast: Allows you to change the contrast of the image by sliding the bar from left to right.
d.Crop: Allows you to select what part of the photo you would like to use.
e.Tap the Checkmark button when you are finished. You can also tap the X button if you want to retake the image.
10.From here you have one of two options. 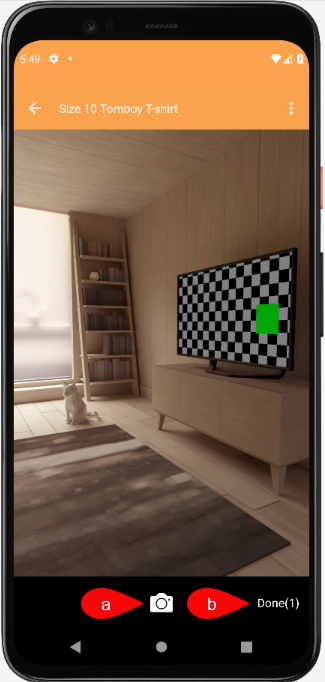
a.You can continue to take more pictures.
b.You can tap the Done button to move on to the next step.
11.You will see the pictures you have taken underneath the Ready to upload section. 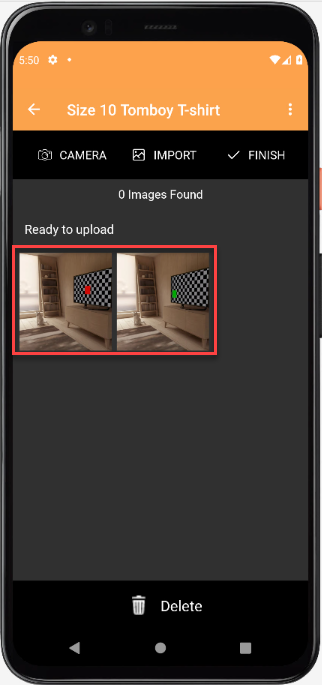
12.Tap the Finish button and your pictures will then be uploaded. 
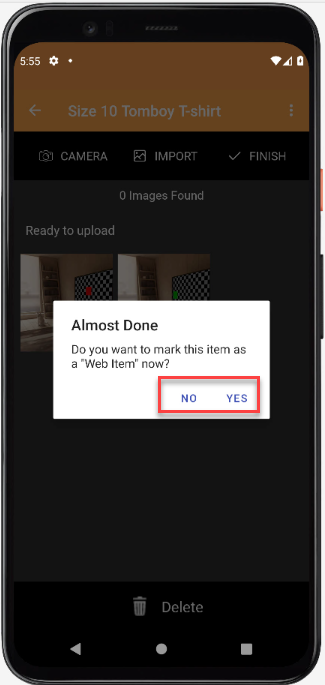
13.You can now select whether you want to mark the item as a Web Item.
If the item is already marked as Web Item you will not see a prompt to mark the item as Web Item.
Your listing will simply be updated with the new images.
This coincides with the Automatic Create New Listing feature in Listing Manager which allows these items to be sent automatically to either Shopify or ShopRW depending on if you have it enabled.
Note: It is possible to create a listing for eBay using this feature but you will be required to edit that listing in Listing Manager before it can be pushed to eBay. This is because there are some options that need to be edited before the item can be sent to eBay.
How To Add Images To An Item Using A Barcode On The Tag
1.Tap the Barcode icon. 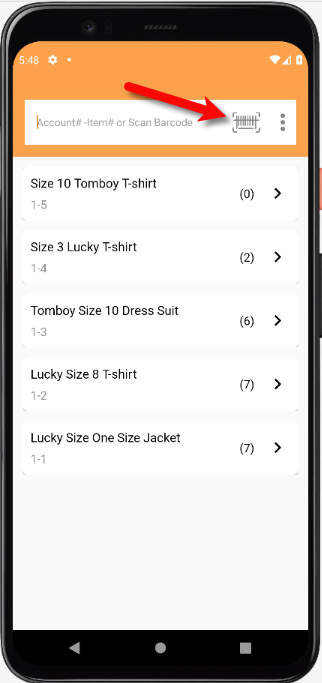
2.Place the tag of the item you want to pull up in front of the device’s camera.
The camera will read the barcode of the item and bring you back to the main screen automatically. 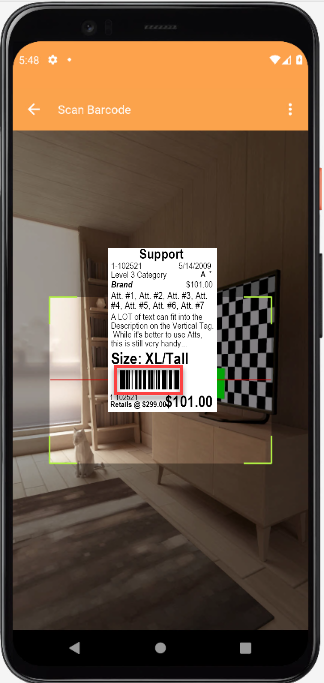
3.Tap the item that the barcode brought up. 
4.You can now take or add a picture, edit existing pictures on the item or delete pictures. 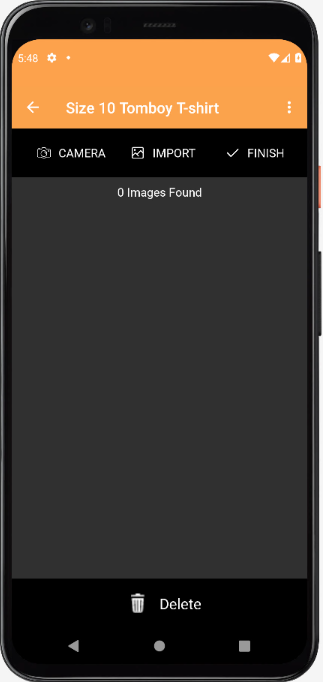
5.To take a picture, tap the Camera icon. 
6.Tap the Take Picture button when you are ready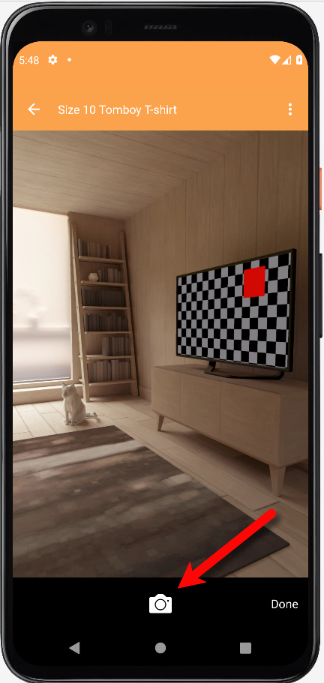
7.You will have some options you can edit after taking a picture of your item.
a.Exposure Control: This sets the exposure level of the image. Raising the radio bar higher makes the image brighter, while lowering the bar makes the image darker.
b.Brightness: Allows you to change the brightness of the image by sliding the bar from left to right.
c.Contrast: Allows you to change the contrast of the image by sliding the bar from left to right.
d.Crop: Allows you to select what part of the photo you would like to use.
e.Tap the Checkmark button when you are finished. You can also tap the X button if you want to retake the image.
8.From here you have one of two options. 
a.You can continue to take more pictures.
b.You can tap the Done button to move on to the next step.
9.You will see the pictures you have taken underneath the Ready to upload section. 
10.Tap the Finish button and your pictures will then be uploaded. 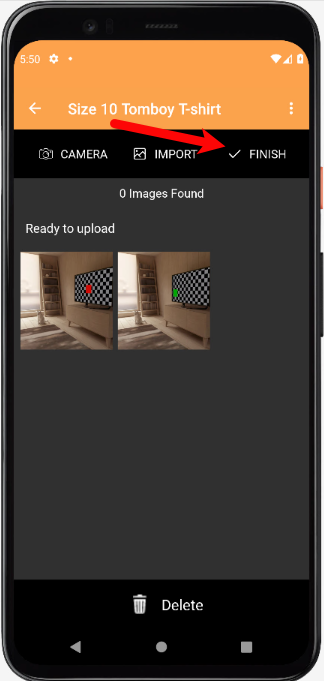
11.You can now select whether you want to mark the item as a Web Item.
If the item is already marked as Web Item you will not see a prompt to mark the item as Web Item.
Your listing will simply be updated with the new images.
This coincides with the Automatic Create New Listing feature in Listing Manager which allows these items to be sent automatically to either Shopify or ShopRW depending on if you have it enabled.
Note: It is possible to create a listing for eBay using this feature but you will be required to edit that listing in Listing Manager before it can be pushed to eBay. This is because there are some options that need to be edited before the item can be sent to eBay.

How To Add Images Using the Import Feature (From Local Disk and Other Sources)
1.Tap the Import button. 
2.You can select images that are directly on your Android device. You can also search through your images using the search option or navigate to another folder where your images are stored. 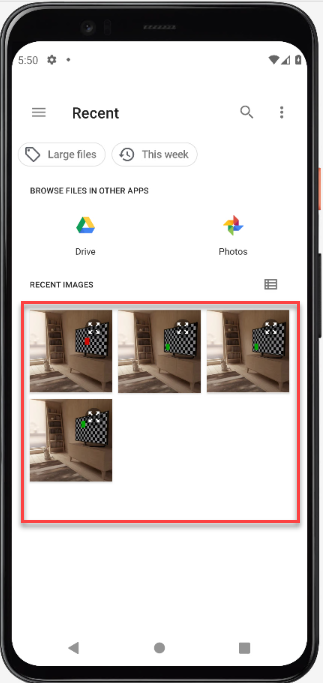
3.On this same screen, you can browse other 3rd Party image sources like Google Drive or Google Photos. 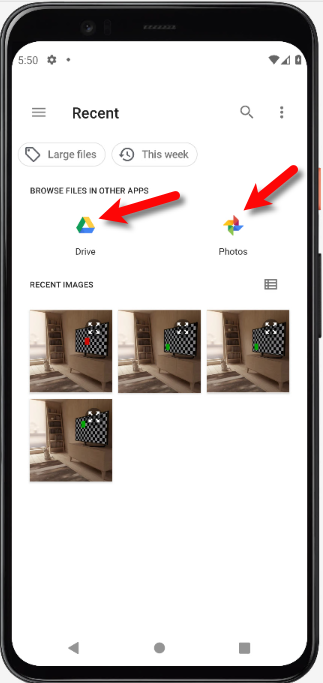
How To Delete Images From The Photo App
1.Tap the Delete button. 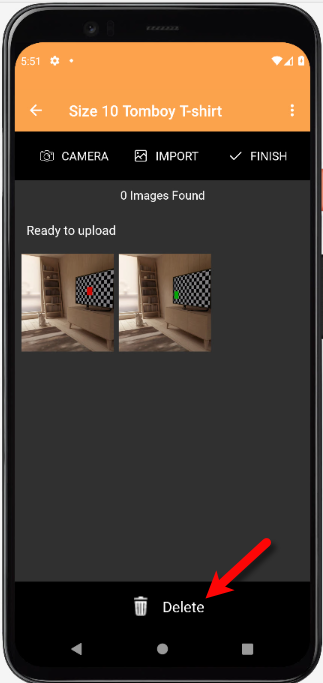
2.Checkmark the images you would like to delete. 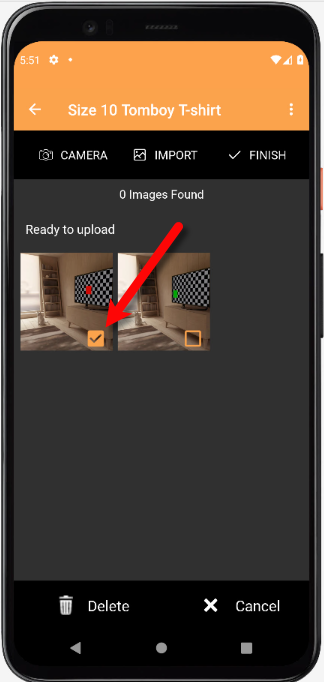
3.Tap the Delete button and the images will be removed from the item. 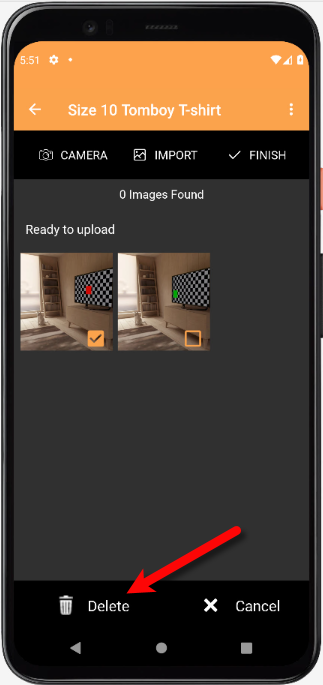
How to Edit A Photo That Is Attached To An Item
1.Once you have opened the item you want to edit, tap one of the pictures attached to the item. 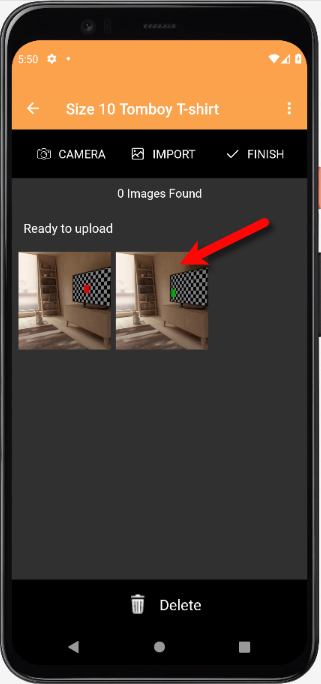
2.From here, you can edit the Exposure, Brightness and Contrast. You can also Crop the image so that you get rid of anything in the image you do not want to show. It is also possible to Rotate the image if it is in the wrong orientation.
Finally tap the Save button. 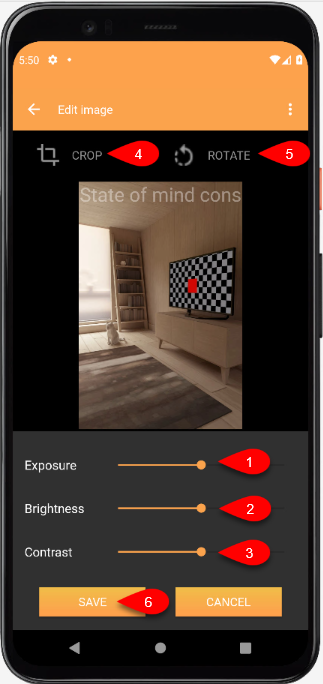
Editing The Settings Within Liberty Photo App
1.Tap the Three Dots menu button at the top right of the screen.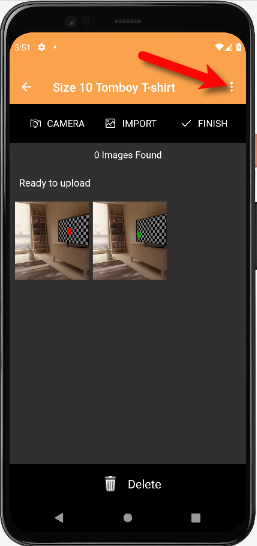
2.Tap the Settings button. 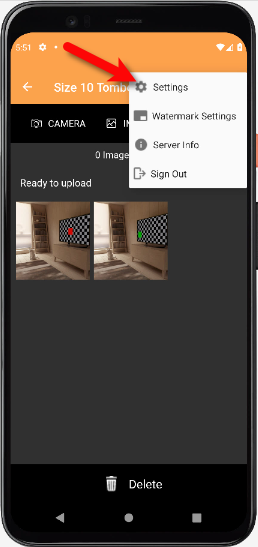
3.You have three options that you can edit: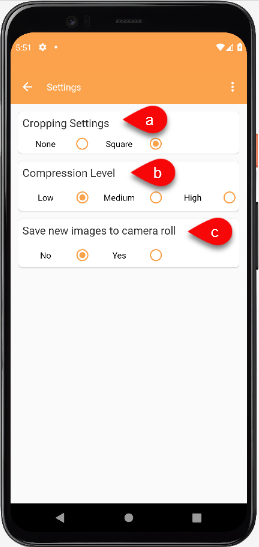
a.Cropping Settings: This basically sets whether you want to use the standard dimensions that your phone would normally use or if you would like to use the Square dimension to format your image.
Note: Shopify recommends that you use the Square dimension when formatting your images.
b.Compression Level: Setting this to Low allows the highest resolution image while setting this option to High allows the image to take up less space on your phone at the slight expense of resolution.
c.Save new images to camera roll: Turning this feature on allows you to save the pictures that you take with your camera while in the app to the camera roll. Turning this feature off, stops your device from saving the image to your camera roll library.
Placing a Watermark Image On Your Pictures
1.Tap the Three Dots menu button at the top right of the screen.
2.Tap the Watermark settings button. 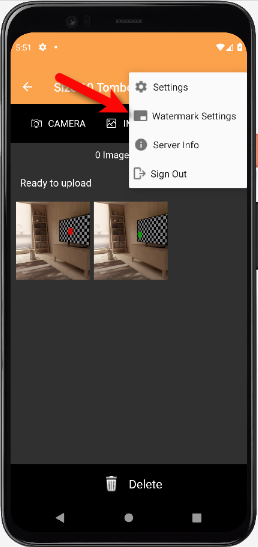
3.A watermark makes an image uniquely your stores.
You have some options that you can edit for your Watermark. 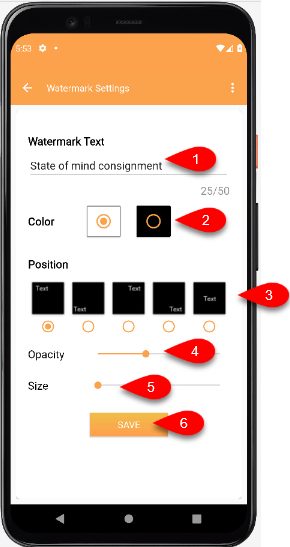
1.Watermark Text: This text that you type in will appear on all of the pictures you take.
2.Color: Sets if you want a border around the Watermark text.
3.Position: Allows you to select what position you want the Watermark to appear at on your image.
4.Opacity: Sets if you want to make the text slightly see through or solid.
5.Size: Sets the size of the Watermark from Small to Large.
6.Tap the Save button when you are done.
Changing Your Which Server You Want To Connect To
1.Tap the Three Dots menu button at the top right of the screen and then tap the Server Info button. 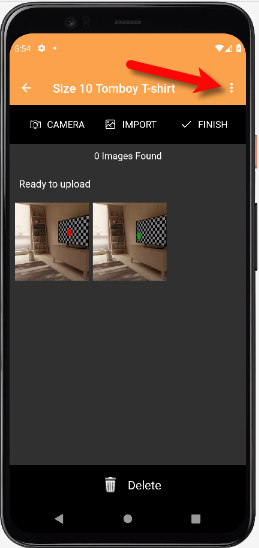
2.Tap the Server Info button. 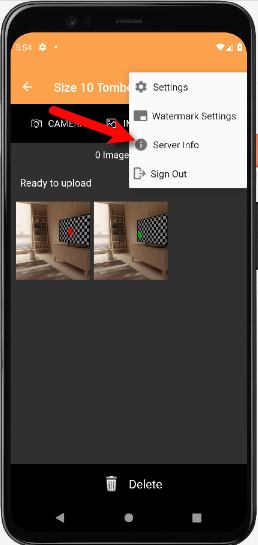
3.Fill in the Description, the name Server is usually fine. Then fill in the Server Address and the Device Key from what you recorded from your Server computer. Then, tap the Validate Server button. 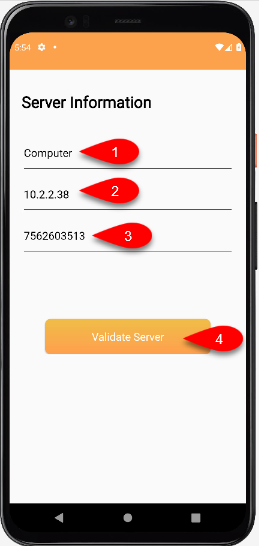
Signing Out Of The Liberty Photo App
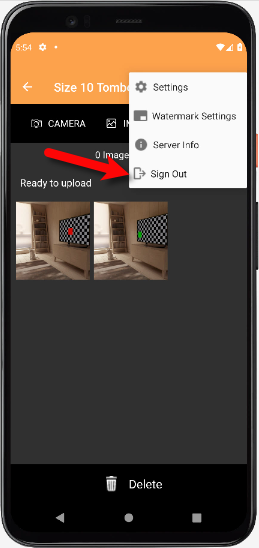
1.Tap the Three Dots menu button at the top right of the screen.
2.Tap the Sign Out button.
3.Tap the Yes button. 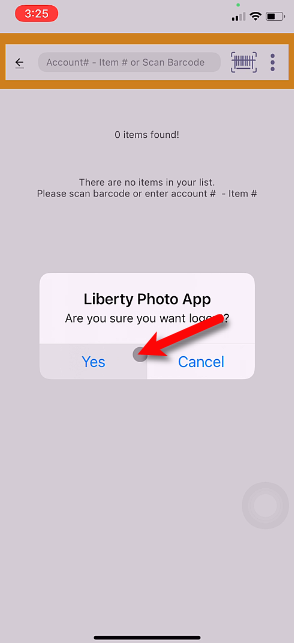
4.Type in the new Username and Password. Then tap the Remember Me checkmark box.
Finally, tap the Sign In button. 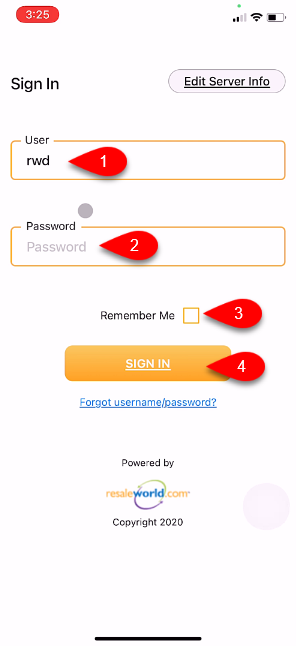
Related Topics
How To Download and Setup The Liberty Photo App for Android
Opening The Liberty Photo App Android
How Use The Camera To Add Images To Items By Using Account - Item Number Android
How To Add Images To An Item Using A Barcode On The Tag Android
How To Delete Images From The Liberty Photo App Android
How to Edit A Photo That Is Attached To An Item Android
How To Add Images Using the Import Feature (From Local Disk and Other Sources) Android
Editing The Settings Within Liberty Photo App Android
Placing a Watermark Image On Your Pictures Android
Changing Which Server You Want To Connect To Android
Signing Out Of The Liberty Photo App Android
How To Download and Setup the Liberty Photo App for Android Video