Changing Your Which Server You Want To Connect To
1.Open the Liberty Photo App on your iDevice and then Sign In.
If you are not familiar with this procedure please visit the following page:
Opening The Liberty Photo App Android
2.Search for the item by using either Account-Item Number or by scanning a tag using the Scan Tag button.
Then open the item.
You can use the following articles for more information if needed:
How Use The Camera To Add Images To Items By Using Account - Item Number Android
How To Add Images To An Item Using A Barcode On The Tag Android
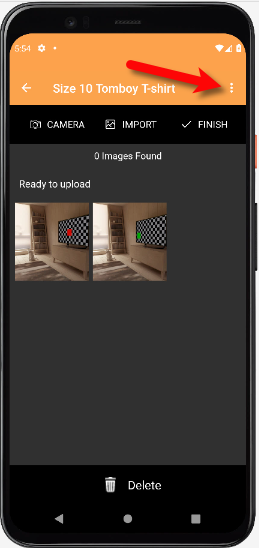
3.Tap the Three Dots menu button at the top right of the screen and then tap the Server Info button. 
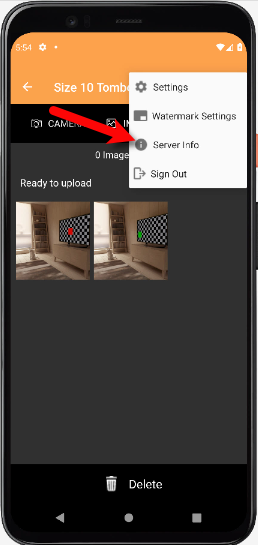
4.Tap the Server Info button. 
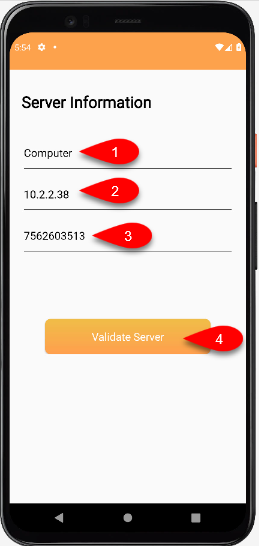
5.Fill in the Description, the name Server is usually fine. Then fill in the Server Address and the Device Key from what you recorded from your Server computer. Then, tap the Validate Server button. 
Related Topics
How To Download and Setup The Liberty Photo App for Android
How To Use The Liberty Photo App for Android Overview
Opening The Liberty Photo App Android
How Use The Camera To Add Images To Items By Using Account - Item Number Android
How To Add Images To An Item Using A Barcode On The Tag Android
How To Delete Images From The Liberty Photo App Android
How to Edit A Photo That Is Attached To An Item Android
How To Add Images Using the Import Feature (From Local Disk and Other Sources) Android
Editing The Settings Within Liberty Photo App Android
Placing a Watermark Image On Your Pictures Android
Signing Out Of The Liberty Photo App Android
How To Download and Setup the Liberty Photo App for Android Video
